
Normal mode:
1520 gear score
Hard mode:
1560 gear score

Brelshaza Gate 4 Boss Guide
Overview
Introduction
Gate 4 is the final fight with Brelshaza, there are three wipe mechanics. The battlefield also has HP and you have to be very careful to not cause unnecessary wipes.
Download our free Lost Ark Overlay to get this guide, cheat sheet, and more within your client. We highly recommend it if you're using a 2nd screen from browser.
This fight has a few significant changes which can be found in the Hard Mode Mechanics section:
- 2 brand new mechanics.
- Due to different pacing, the meteor locations/strategy are also different.
Full Video Guide


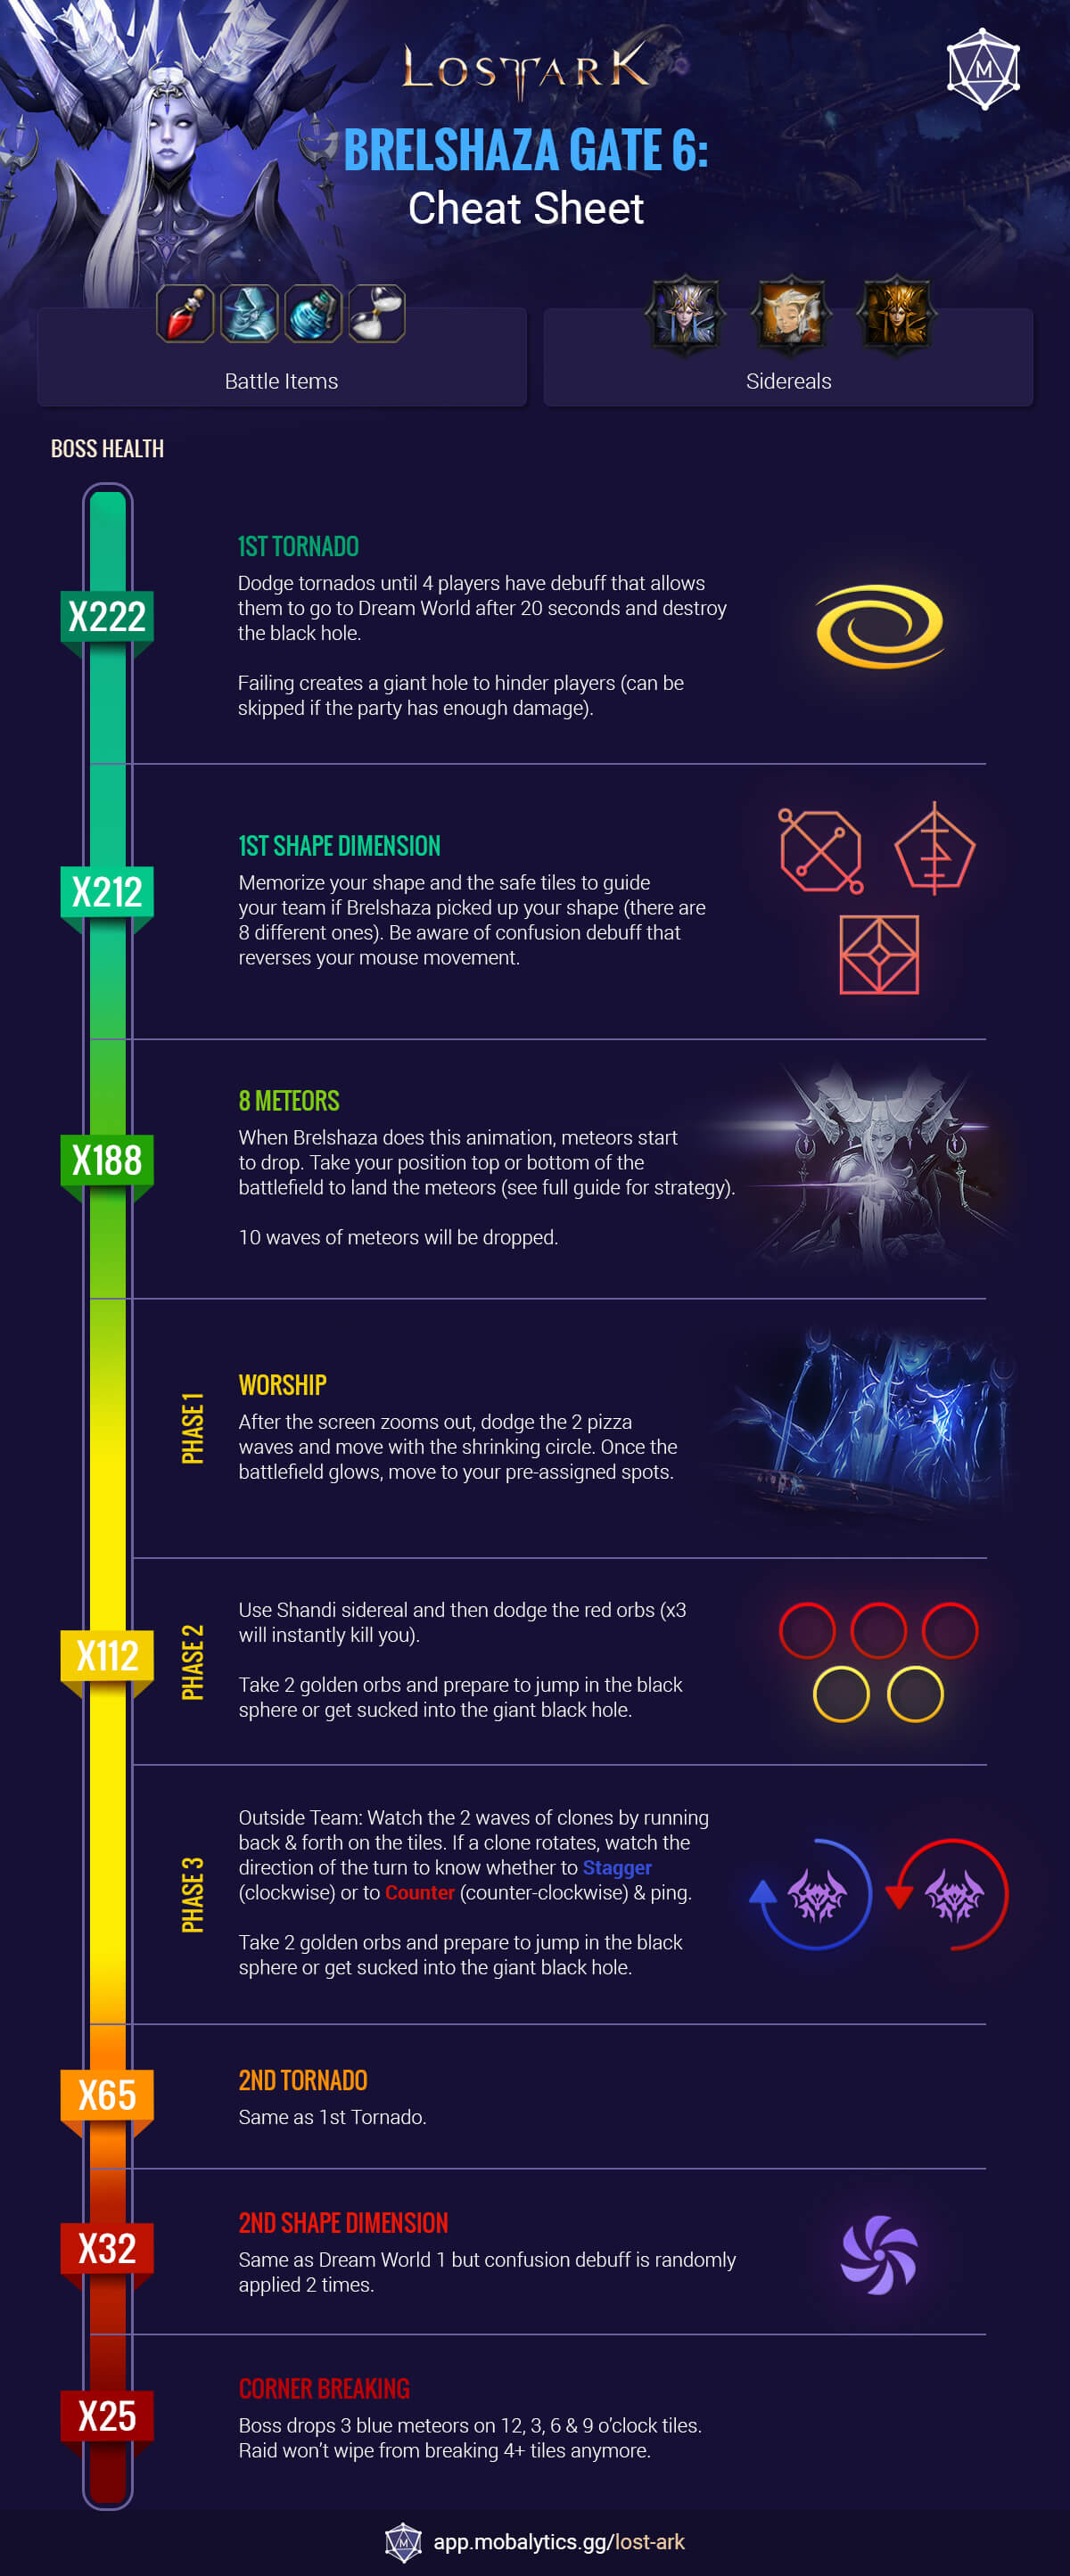
Cheat Sheet
Battlefield
Introduction
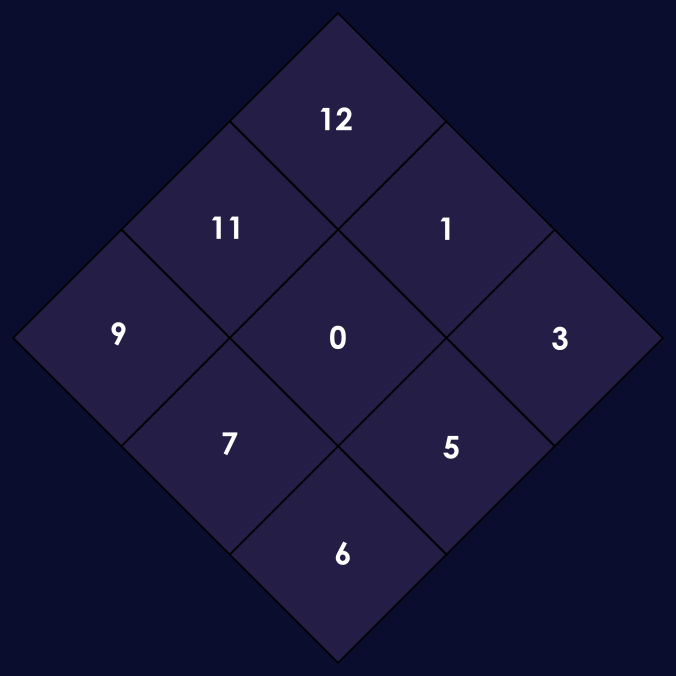
The battlefield consists of 9 tiles which can be destroyed, this means that all the tiles have a HP value. Additionally, you can fall off the edges of the battlefield, much like in Valtan Gate 2. Don’t worry, the game does not allow you to just run out, so as long as you’re careful with Brelshaza's mechanics you’ll do great!
How tiles work
- Tile HP: each tile has “3” HP where blue meteors hit for “1” HP, this means that in order for a tile to break, 3 blue meteors must land on it.
- If the center tile, or 4 tiles are destroyed then it causes a wipe.
- Yellow meteors destroy any tile it lands on instantly, as well as all the tiles around it.
- Tiles respawn every 1 min 40 seconds from its destruction.
Use the Tile Timer Tool to track when tiles will respawn.
Positioning
During the fight random meteors will target players, they need to be carefully dropped onto specific tiles in order to avoid unnecessary tile breaking and wiping.
X113: Each player should be assigned a tile, except the middle tile:
- Party 1 takes cardinal positions (x3).
- Party 2 takes ordinal positions (x3+1).
Key Mechanics
X222 1st Tornado
Brelshaza's hand will glow and 4 random players will have the dream confusion debuff. Many dream tornados will spawn across the battlefield moving randomly.

Dream confusion debuff
The debuff allows you to enter the dream world after 20 seconds to destroy the black/white hole that appears on the map. This is to save your raid from a giant black/white hole that hinders them while fighting brelshaza.
Dream tornados
They spawn randomly and move in a straight line back and forth, they deal a lot of damage.
It’s advised that supports use their awakening’s shield during this mechanic.
If you lose your dream confusion debuff or fail to destroy the black hole, a big black/white hole will be summoned in the battlefield pulling/pushing the whole team while fighting.
This mechanic can be completely skipped if your party has enough damage.
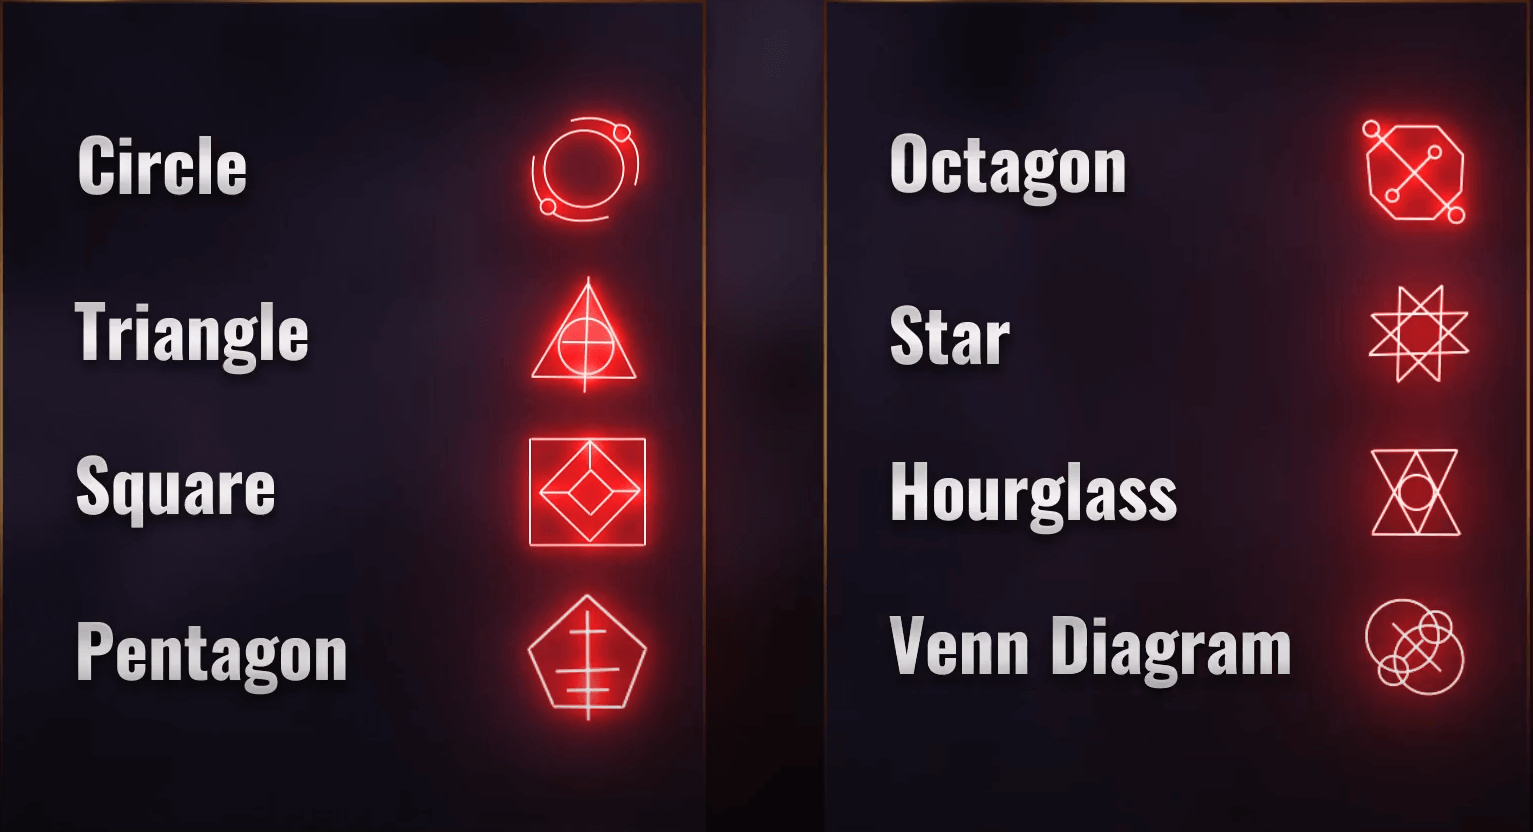
X212 1st Shape Dimension
Brelshaza teleports herself to the center of the area, and everyone else to a different dream world. She will start shooting white orbs everywhere that staggers players and deals damage.
Each player will have a different shape on their screen and Brelshaza will start casting an AoE on two rows which will instantly kill you.
During the 1st wave of attacks everyone will have a confusion debuff that reverses the mouse movement.
The 2nd wave will have normal mouse movement, no confusion debuff.
The 3rd wave will have the confusion debuff.
If you are struggling to move with the confusion debuff, you can use Innana to remove it.
Position yourself exactly behind Brelshaza to avoid getting hit by the white orbs.

Wait until she finishes and position yourself in the center of the middle tile, so you can be able to move quickly to the nearest safe tile.
Once you’re inside the dream world, write in chat the name of the shape and the number of the safe tiles so everyone can see it.
Note: You need to be close to Brelshaza to be able to see which shape she chooses.
Brelshaza will then land on the ground, and cast the white orbs again. She will show a random shape from the ones seen inside the dream world. Go to the safe positions depending on the shape that appeared.
X188 8 Meteors
Blue and Yellow meteors will start targeting players and you will need to follow a strategy to land those meteors on specific tiles to avoid a wipe.
- Each x50 hp bars there will be a yellow meteor dropping, adjust your party damage according to that.
- Every 1 minute 2-4 blue meteors will be dropping.
Brelshaza teleports to the center, starts levitating and summons 1 yellow meteor and 7 blue meteors.
These meteors will drop in a specific order on each player, the yellow glow will appear first, then pay close attention to the order of the blue glow and stand in your respective position.
- If Player A glows yellow, they will have to go to position 1.
- If Player B glows blue first, they will have to go to position 2.
- If player C glows blue after Player B (2nd glow), they will have to go to position 3.
- …
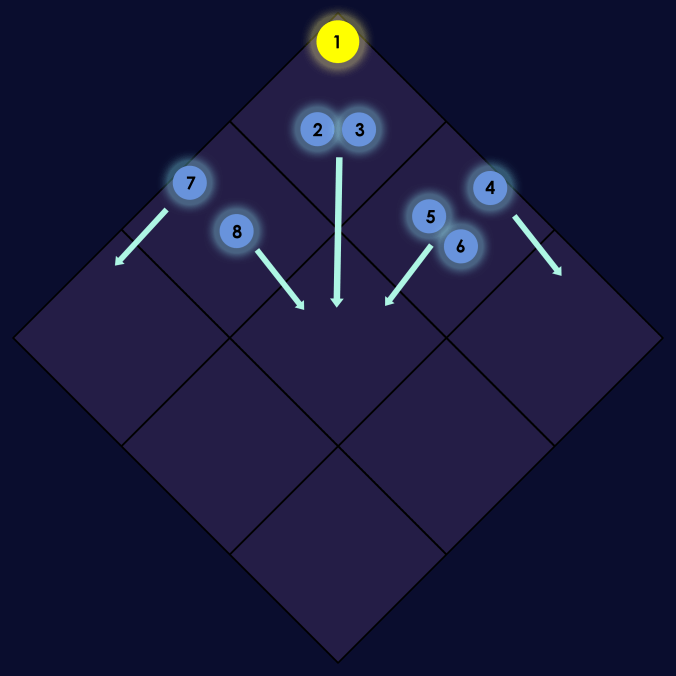
Reminder: The yellow meteor also breaks the tiles next to it, so make sure to drop it on one of the corner tiles and position yourself on the very edge to avoid hitting the middle tile.
After successfully performing this mechanic, 3 tiles should break (11-12-1) and will need 1 minute 40 seconds to recover. Fight towards the bottom side of the battlefield to avoid getting knocked out.
During the fight a few more meteors will fall on players over time, you will need to land it on specific tiles depending on your strategy:
A Common Strategy
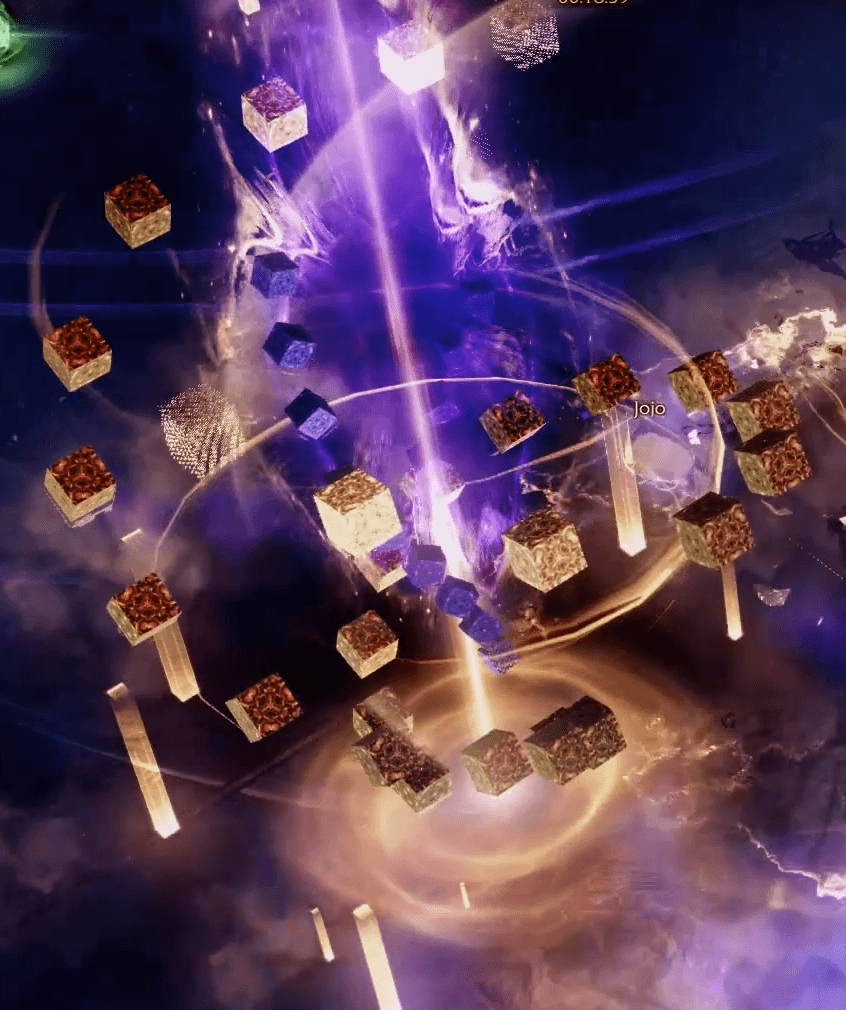
X112 Worship
Brelshaza will leave the battlefield and her giant shadow will appear to perform a ground slam to summon a giant black hole in the center of the battlefield. It deals damage to players, so don't get too close.
The circle in the middle will be gradually shrinking and a pizza attack from the center will happen twice.
Afterwards, you may / may not see a tiny black hole glowing on your tile, overall there are 4 tiny black holes that appear randomly on 4 tiles.
Many red orbs start moving towards the giant black hole from the outside. If you get hit by 3 of them, you will die. Amongst the red orbs there will be a few golden orbs too, each player needs to take 2 golden orbs if they don’t have a tiny black hole on their tile . If you have a tiny black hole on your tile, only 1 golden orb is needed to enter that tiny black hole..
Players that take the black orb will stay outside, those that don't will be transported into another dimension. If players fail this and there are more than 4 inside, the players that didn’t receive a buff won’t survive.
The outside battlefield will have a clone in each tile that either does nothing, or rotates clockwise or anti-clockwise. In the inside battlefield clones will appear that can be either countered or staggered depending on the outside clone’s animation.
- Avoid both pizzas, stand at 1/3/5/7/9 o'clock.
- Gradually move to the center to avoid getting damaged by the circle shrinking
- Before she strikes the ground, a glow and the battlefield will appear, run to your pre-assigned tile.
- Stand on your pre-assigned tile and take 2 golden orbs.
If your tile has a black orb, wait until it starts shaking and gets brighter then enter it.
If your tile doesn’t have a black orb, do nothing, just avoid the red orbs and wait.
The 4 players outside must do the following:
- In order to see the clones rotating, you must be in that tile and touching the clone. This means that you should move between your assigned tiles to check if the clone rotates.
- If a clone rotates, ping the tile for the inside team to move to that tile.
- Ignore Brelshaza and keep moving between the tiles.
If the clone rotating clockwise, the clone inside will (need stagger)
If the clone rotating anti-clockwise, the clone inside will (need counter)
There will be 2 waves of clones with 30 seconds between them, each having 2 rotating clones.
The 4 players inside must do the following:
- Follow the pings from the other party and move to that tile.
- Counter or stagger the clone that appears on that tile
- Get the buff the clone drops.
Stagger clone: it has a very low stagger bar that can be depleted easily, a whirlwind bomb can remove 80%~ of the stagger bar meaning you’ll only need one skill to finish it off.
Counter clone: it will always face outside, stand at the edge of the tile while your character is facing towards the center of the battle field.
If you fail to counter or stagger the clone, a blue meteor will drop on that tile taking 1 of the tiles’ HP.
When the clone is countered or staggered successfully, it will drop a buff, each player inside needs a buff to survive.
X65 2nd Tornado
Same as the 1st tornado mechanic.
X28 2nd Shape Dimension
X25 Brelshaza’s End
Brelshaza will teleport to the center of the battlefield and the 4 corner tiles will be removed (12, 3, 6, 9). The chance of you getting knocked out will be higher, play safe and dodge all her attacks. Losing more than 4 tiles will no longer cause a wipe, unless the middle tile is destroyed.
Land all incoming meteors at 11, 1, 5, 7 tiles.
During this phase, each wave of meteors have 3 blue meteors, try landing 2 blue meteors on the same tile and 1 on a different tile, so as to break only 1 tile per wave.
The yellow meteor does not appear anymore, but the "Giant clone" and the “Blue gravity hole” appear at the same interval of 1 minute.
Counterable Mechanics
Counter Meteorite
Brelshaza will lower her purple orb and stand still for a while. Depending on Brelshaza’s position, 2 meteors spawn moving towards the raid from either:
- 12 and 6 o’clock
- 3 and 9 o’clock
You can block the meteor explosion by countering it.
If the counter fails the meteor will continue on its path and explode causing a large aoe damage.
Dream Tsunami
Before battlefield destruction
Same as gate 5 with a small chance to have a follow up cone shaped attack that can be countered.
Before battlefield destruction
Once she casts the dream tsunami she will teleport to a random player and cast a cone attack that follows a player - much like in Valtan Gate 2.
Counter After Teleportation
Brelshaza will shield herself, teleport to a random player and become counterable.
If she is not countered, the shield will explode; dealing a lot of damage, knocking players up and creating fan shaped explosive circles that explode towards a target.
Random Notable Mechanics
Massive Push
A large yellow indicator will show to one side, then either a circle or a donut yellow indicator will appear. Getting hit by this skill and not using push immunity or time stop will knock you out of the battlefield.
If the first yellow indicator is on both sides instead of just one, this means that after dodging the first attack, the boss will teleport to a random player and can be countered.

Tanking this mechanic will give a debuff. If a player has 3 stacks of this debuff a blue meteor will be summoned. It’s advised to drop extra meteors caused by this attack at tiles 3 or 9.
Fail
Counterable pattern
Giant Clone (Ding)
Starts after the dream world mechanic It occurs every 2~ minutes (can overlap other random mechanics and meteors)
Giant meteor
Triangular sphere
They move in a random direction when they spawn.
Double Meteor | After Blackhole Only)
The double meteor is easier to dodge as the hitbox is much smaller.
Enhanced Triangular Sphere
Will target a player and follow them.
Red & Blue Shock Wave
Red
- 4 players will have a big green/yellow circle that will deal damage after a while
- 2 players will have 1 big red circle 1 by 1
- 2 players will have nothing
This red circle must have at least 4 players standing in it otherwise the person with the red circle will take a lot of damage.
When the 1st circle disappears, the 2nd player will get their red circle, and the process repeats but this time with a minimum number of 5 players standing in it..

Red circle debuff duration is 7 seconds.
Blue
Everyone with a blue debuff/string needs to stay together in the blue circle, everyone else needs to stay away until the blue circle disappears.
The blue circle debuff has a 8 second duration.
Random Mechanics
Falling & Gathering
Same as gate 5, but it takes a longer time to explode
A circle safe spot must have at least 3 players to prevent damage.
It’s recommended for everyone to stack in 1 circle.
Outcast
Brelshaza shoots 3 orbs forward, if they hit a player it will give them the outcast debuff.
The outcast debuff causes the player to be teleported to outer space, completely leaving the battlefield, after a while Shandi will return you back to the battlefield. This mechanic deals no damage and there is generally nothing dangerous about it.
This mechanic can only be dangerous if you return mid mechanic and you cannot dodge/complete it.
Grab
Brelshaza will punch forward with 1 hand, then perform a grab in front of her with both hands.
If you get grabbed, Brelshaza will throw you a small distance away, if you are close to the edge of the battlefield you will fall, following this up with fan shaped spikes forward. If she successfully grabbed a player, a backside fan shaped spikes will follow up.
After the black hole mechanic, she will fire an energy wave in front of her if anyone gets grabbed.
Pre-battlefield destruction
After battlefield destruction
Front spikes:
Back spikes:
Rotating Laser
Brelshaza will stretch her arms and cast lasers in a straight line, she will then gradually rotate in one direction. After the blackhole mechanic, she will rotate once in one direction, briefly stop, then will rotate again in the opposite direction - very similar to the T2 abyssal dungeon.
After blackhole
Cross Imprison Explosion
Brelshaza casts a cross explosion, if she casts it once then it will only deal damage, if she casts a second explosion then all players hit by it will get imprisoned.
After blackhole:
The cross explosion becomes bigger, it only casts once but if players are hit by it they will get imprisoned.
Imprison Attack (Blue Strips)
Blue indicators will appear in a random pattern that will imprison players.
Spinning Chains
A safe red circle will appear on a random player, after a while 2 spinning chains will rotate dealing damage, knocking back and applying a bleed stack to any players not in the safe spot.
Throwing Spheres
Brelshaza will shoot a sphere forward, it will then split into more spheres.
If 2 spheres are launched 1 by 1, they will split into more spheres that follow nearby players. When they hit players or disappear, they will leave an explosion on the floor that deals a lot of damage.
Rushing Claw
Before blackhole mechanic
Brelshaza will rush forward while slashing.
After blackhole mechanic (Counterable):
After her slashes, she will perform the same attack backwards which can be countered. If she is not countered, explosive triangles that target players will be summoned that can knock players down and deal damage if it hits them.
Failing counter
Demon Hands
Multiple red hands will spawn and shoot towards certain players, knocking them up if they land.
After blackhole mechanic
The hands will be followed by explosive lines, much like the explosive lines in gate 5.
Hang Up (Rope & Cutter)
2 players will have ropes linking them with Brelshaza, and 4 players will have spikes around them.
The players with spikes need to walk through the rope to cut it, otherwise a big meteor will drop on the player who is still connected with Brelshaza.
The spikes also deal damage to the nearby players
Only 1 rope can be removed at a time, so 1 player has to rush and cut the other rope.
Failing 1 rope:
Pizza
Same as gate 5.
After black hole mechanic
The pizza increases to 4, and the last slice is fake. The real safe spot for the last slice is the opposite slice.
Glass Window
Same as Gate 5 but there is a glowing cone that follows a target, if it's on you, keep it away from your teammates.
After black hole mechanic
The glowing cones can increase to two cones instead of just one.
Truth/False Dreamy Eyes
Same as the medusa mechanic. If the lines are going inward look to the center of it, if the lines are moving outward, look away.
After blackhole mechanic
There is an extra eye after the first eye and they move faster.
Sphere explosion & Stagger
Happens only after the black hole mechanic.
Brelshaza will raise both her hands, summoning 2 red circles in front of her and 1 blue circle in a random location around her.
2 players must step into the red circles to get caught by Brelshaza, and 1 player into the blue circle. They will then have to stagger Brelshaza.
If a player didn’t step in the circles, an explosive sphere will appear and deal a big aoe damage. If you were too slow, it’s advised to use time stop, because the damage from this mechanic is very high.
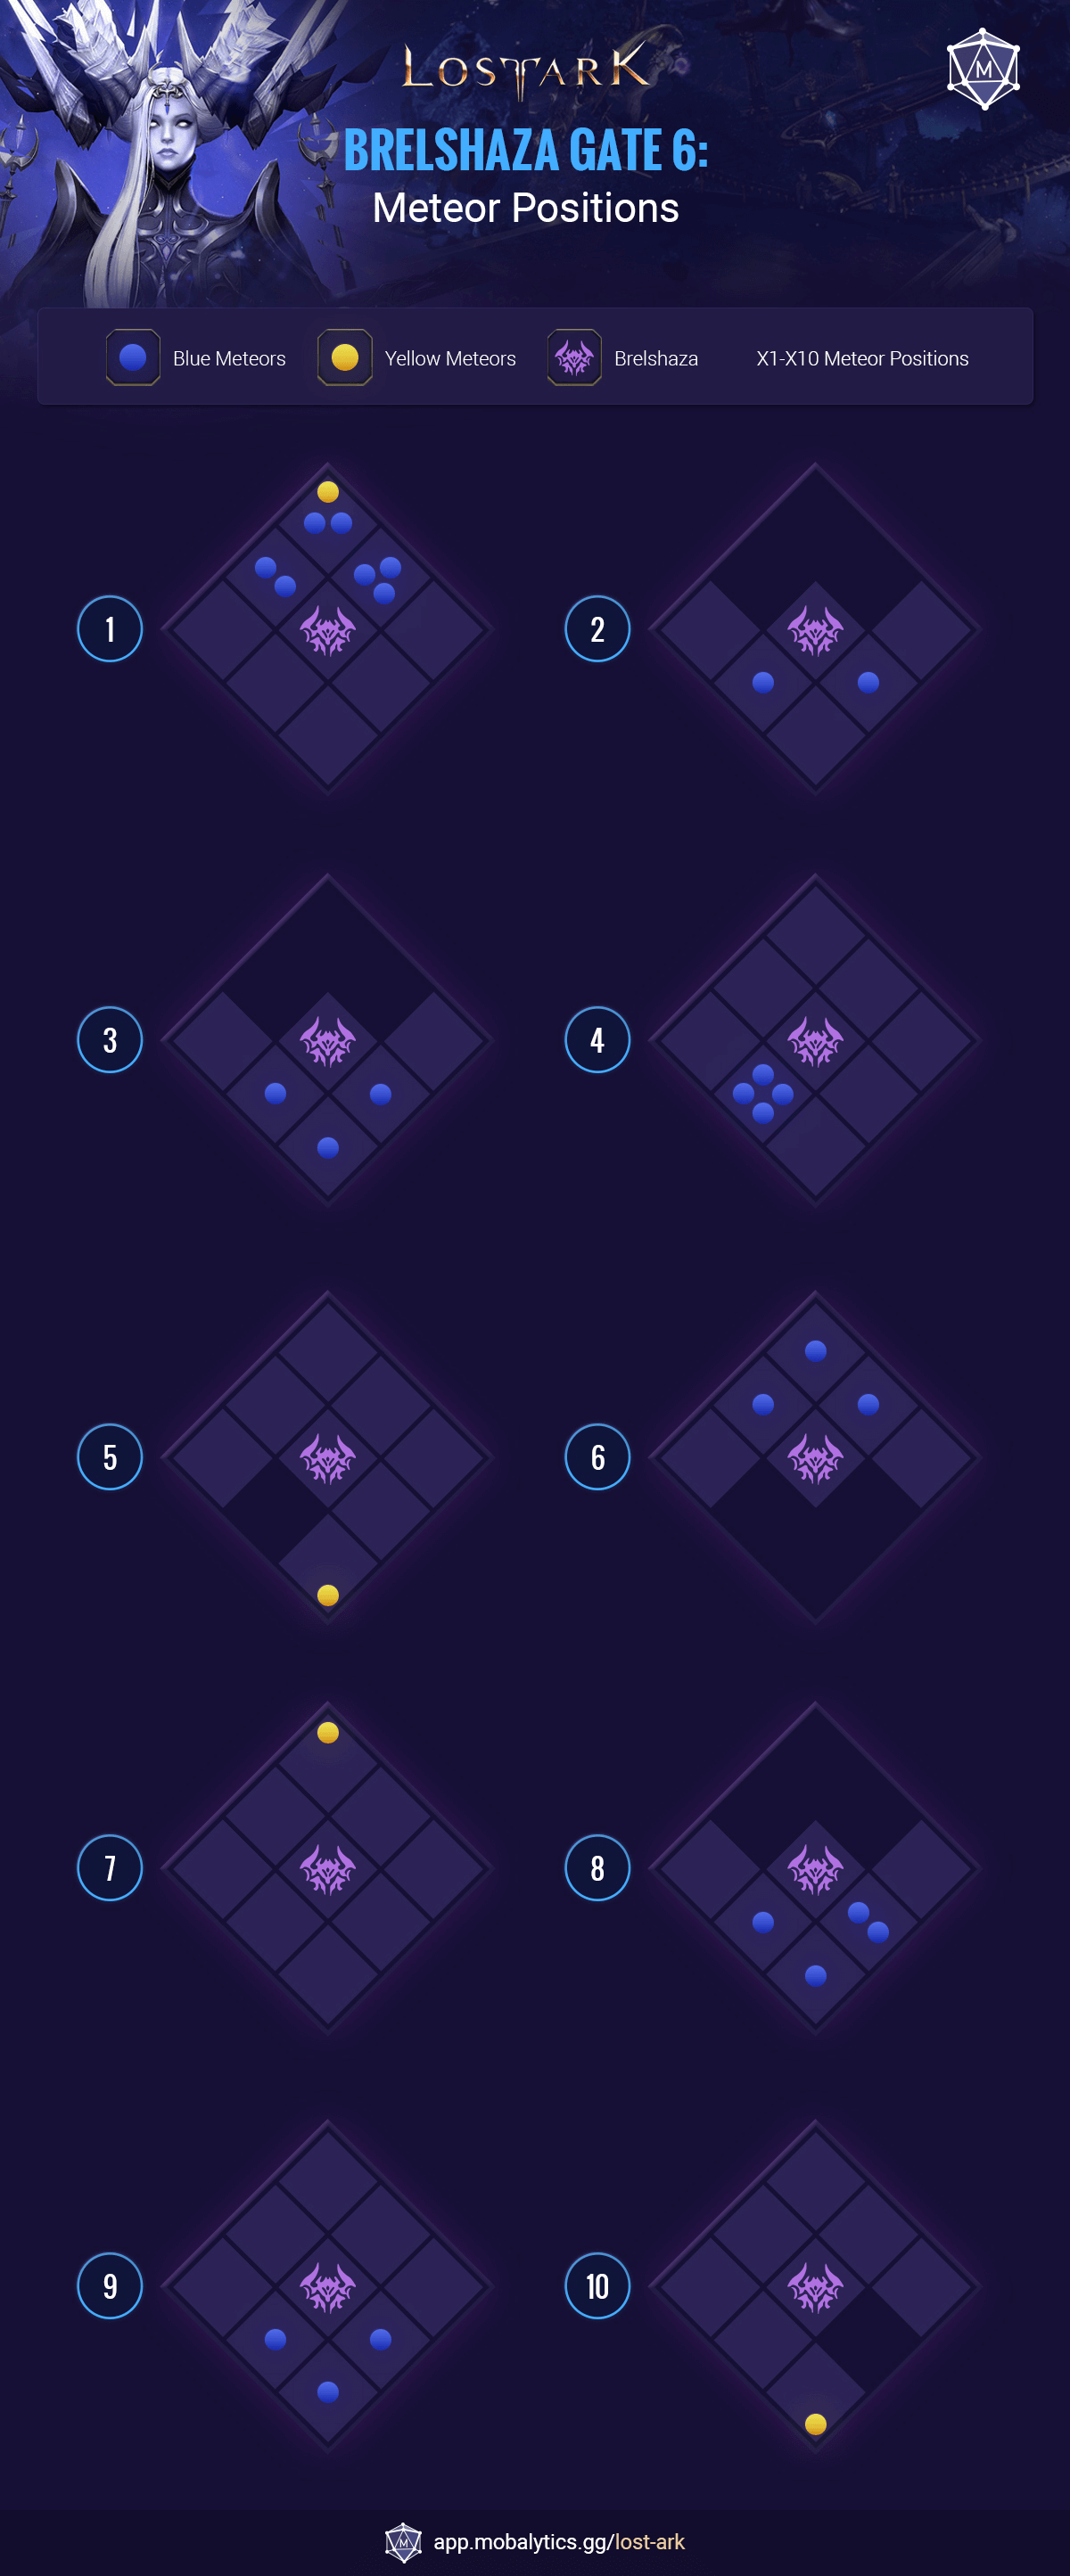
Hard Mode Mechanics
Meteor Positions

Then, the positions after using Shandi Sidereal:

x7 - Meteor Counter
- Boss appears with 160 Shield Bars
- During this phase certain x3+1 positions will flash blue.
- A meteor will spawn and move towards the boss in each x3+1 side.
- The side that flashed twice will have 2 meteors spawn instead,
- There are a total of 4 rounds of meteors spawning.
- Each having 3 blue and 2 red meteors.
- After her shield is depleted, orbs will spawn all around the battlefield.
- Brelshaza will then cast a wipe attack.
When the meteor mechanic starts, it's recommended to stop dps to avoid accidentally attacking a red meteor.
If you have a Sidereal available, use Azena to help DPS the shield.
- Assign 4 people with x3+1 positions.
- 1 Flex player should go to the position of the first flash.
- Meteors that flash blue should be countered.
- After countering you will get a beam that you need to aim at the boss.
- Meteors that flash red should be ignored.
- After her shield is depleted, pick up at least one orb to survive the wipe attack.
- Not countering a blue flashing meteor will cause an AoE knockback in the center of the battlefield that can knock players out of the battlefield.
- Attacking the red meteors will cause an AoE knockback that can knock players out of the battlefield.
x0 - End Orb
- Brelshaza teleports to center and spawns an orb.
- The orb drops smaller orbs when attacked which increase damage dealt.
This must be done quickly.
- Attack the large orb.
- Pick up smaller orbs to enhance damage to the large orb.
Sidereals
Optimal use
Azena can be used anytime if you're lacking dps, just like the previous gates Azena auto target the available boss with her ancient spears.
Shandi slows the time and resets the cooldowns of all skills including awakening, can be used during the x113 black hole mechanic to slow down the red projectiles.
Innana is the same as previous gates, her magic circle reduces damage and cleanse the debuffs, optimal use it during the dream world mechanics to remove the confusion debuff.