
Normal mode:
1500 gear score
Hard mode:
1550 gear score

Brelshaza Gate 3 Boss Guide
Overview
Introduction
Download our free Lost Ark Overlay to get this guide, cheat sheet, and more within your client. We highly recommend it if you're using a 2nd screen from browser.
This fight has many changes in Hard Mode.
You can find the changes in these mechanics:
Blue:
Yellow:
Red:
Star:
Full Video Guide


Cheat Sheet
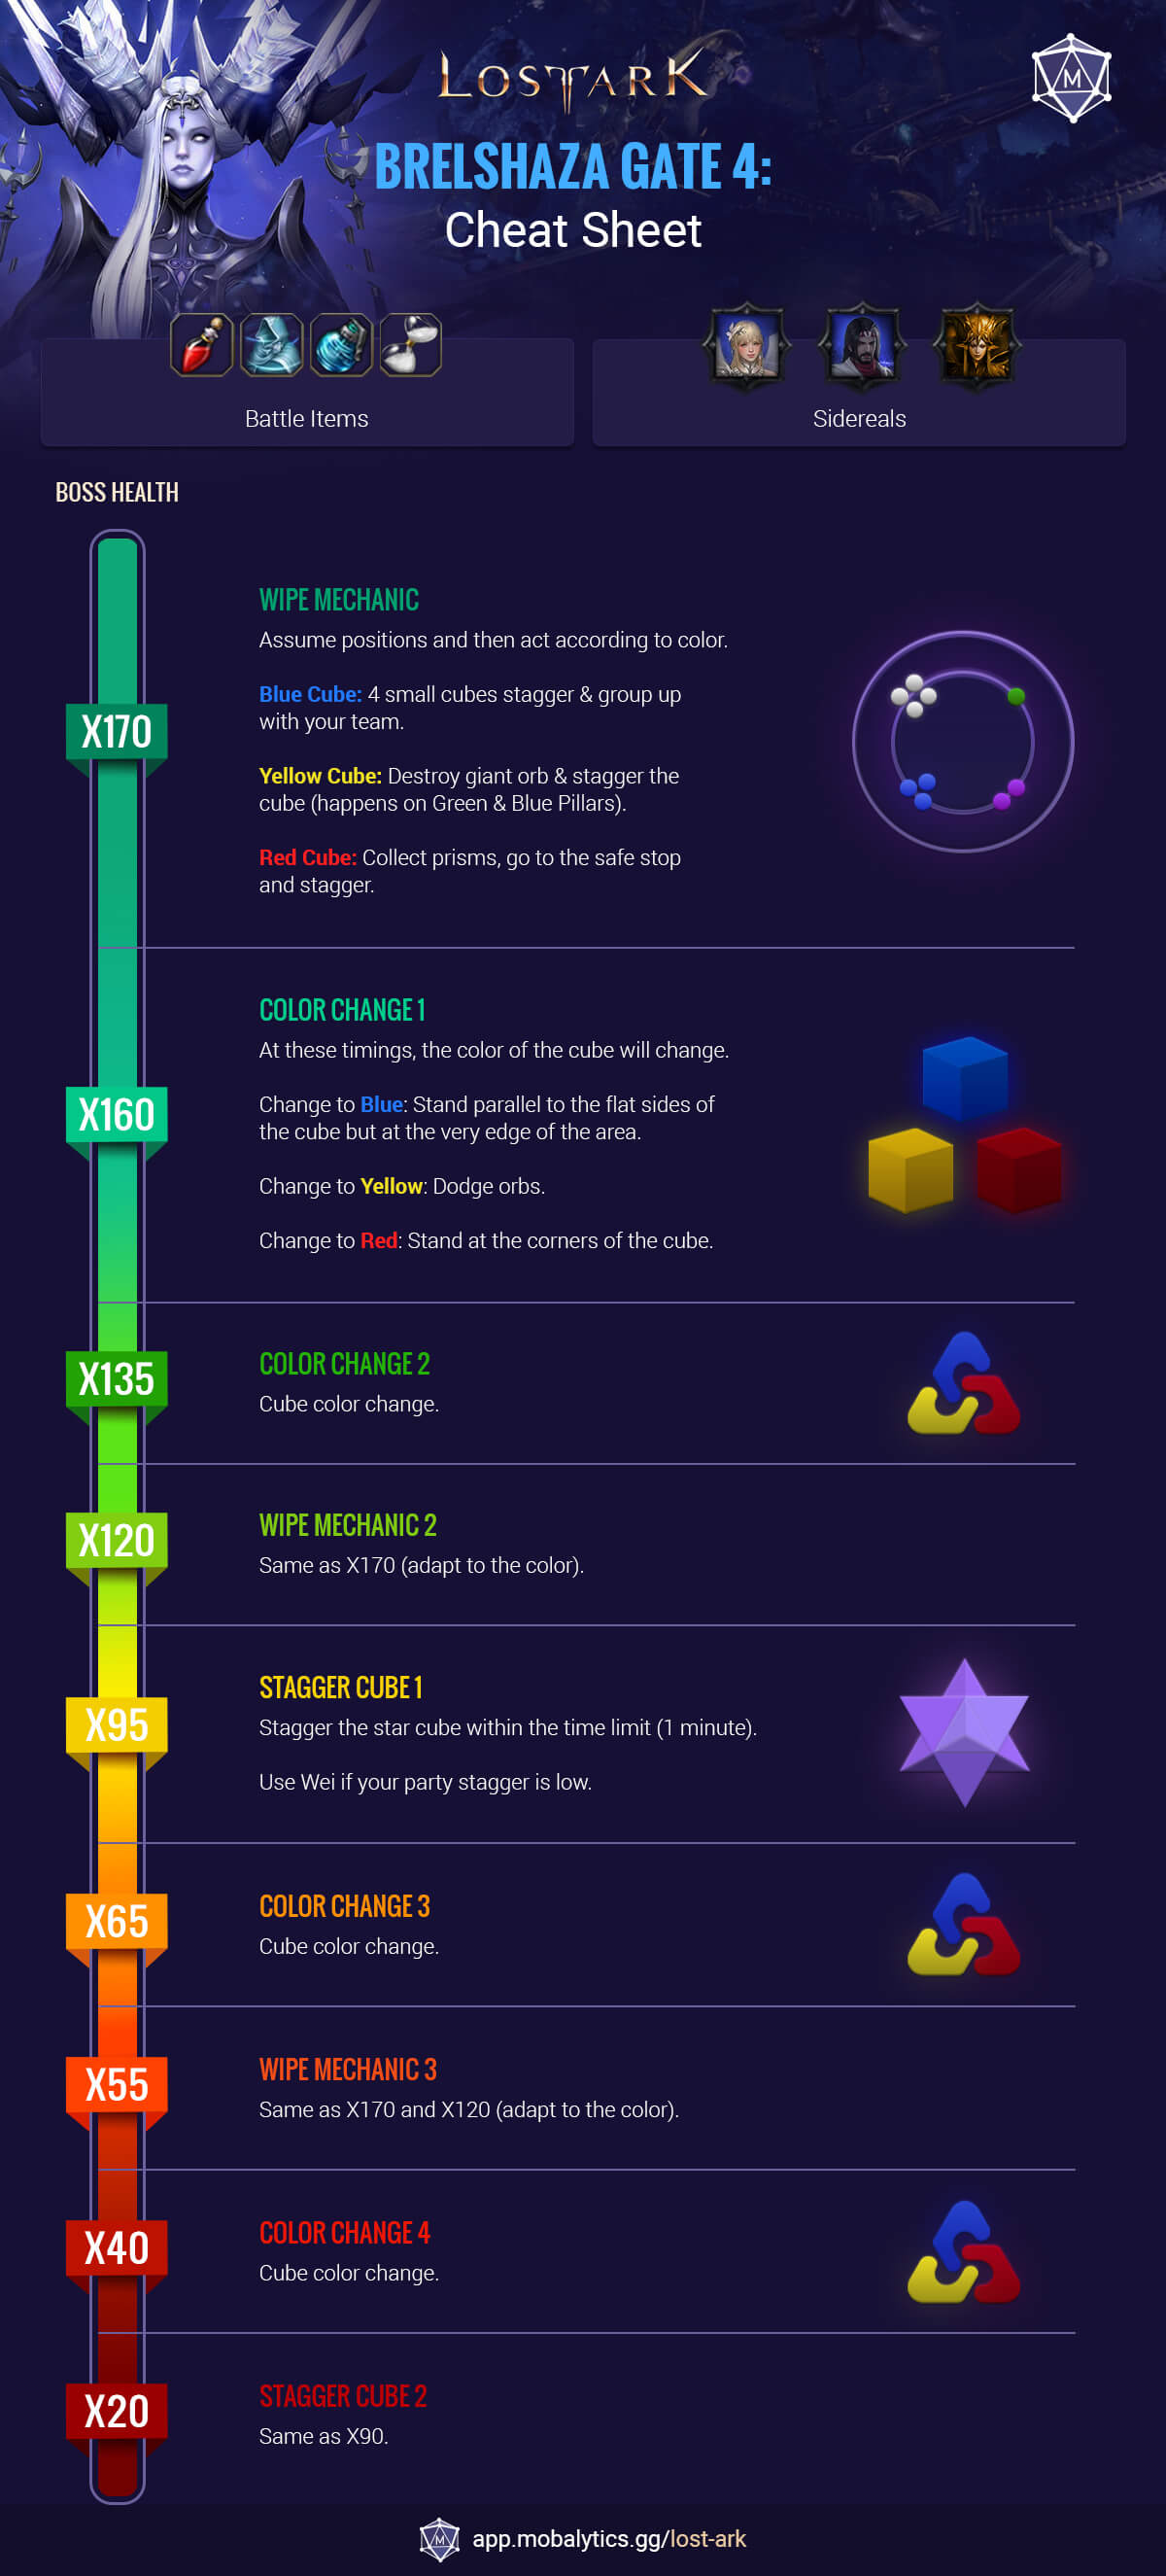
General Fight Mechanics
Overview
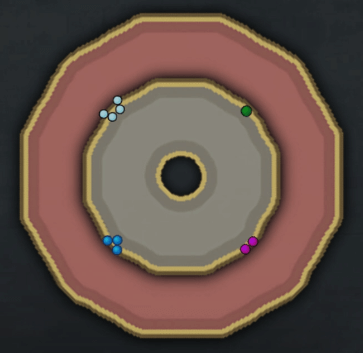
In this fight, the camera follows the player and rotates with them, making it very hard to navigate an ordinal or cardinal position. To solve this, assign your team positions based on the coloured dots at the edge of the battlefield on the minimap.
Stepping outside the inner circle will give you a debuff "Erosion", if you get x8 stacks of it you will instantly die, the debuff cannot be removed by using panacea or purify skills. Only the Inanna sidereal skill can remove these stacks


Failing to do certain mechanics will give the cube a buff stack. Once the cube gets 10 stacks it will wipe the whole party. You can use the inanna sidereal skill to remove the stacks.

A lot of mechanics and basic attacks from the boss are designed to knock you out of the inner ring. Make sure you know and use your stagger and push immune skills to avoid getting knocked into the outer ring.
Blue Cube
Color Change
Once the cube swaps its color to blue, all you need to do is stay at the edge of the inner circle in a line with the cube sides because it will explode a few seconds after swapping, if you get hit by that you will be knocked out.
During this mechanic, the boss is taking reduced damage.
Targeted Flames mechanic will happen after the explosion.
Targeted Flames
All raid party members will have a target mark under their feet, and a few seconds later flames will land wherever that player is standing at.
These flames have a damage over time effect while you’re in them and with each tick the main cube will gain 1 stack on boss. Remember that x10 stacks on the boss will wipe the whole raid.
Stack together to land all the flames in the same spot to avoid having multiple flame spots in the battlefield.
Blue Wipe Mechanic
4 small cubes with a stagger bar will be summoned at each colored dot on the mini-map.
After a successful stagger you will be able to receive a buff that prevents you from dying. Two players from each party will be imprisoned, while the other two will get a typing mechanic. The players with the typing mechanic will need to free the imprisoned players.
- Assign 2 players to stagger each cube.
- Once they are done, they must move to the other 2 players in their party and stack together before the imprisonment happens.
- Following this strategy will allow the players that got the typing mechanic to quickly free their teammates before the cube shoots its laser of death.
Note: You can use your before the mechanic starts to free the imprisoned players whilst doing the typing mechanic.
You now must stay inside the golden zone and dodge an attack.
- If you leave the area then you will not save the buff.
- Use if you aren't good at breaking imprisonments.
Yellow Cube
Color Change
Once the cube swaps its color to yellow, 4 small purple diamonds will spawn in fixed positions between the dots on the map.
These diamonds will start randomly throwing orbs that stagger and deal damage.
The cube boss will receive reduced damage, so you should focus on dodging instead of dealing damage.
What Happens?
- Same core mechanic as Normal Mode.
- At the start, explosions will occur in the outer part of the circle.
- Getting hit by a projectile will cause an orb to spawn, dealing additional damage.
What To Do?
- Stay close to the boss at the start of the mechanic.
- Dodge the projectiles.
Following the Mechanic:
After this mechanic, blue lines will come out of the cube that need to be dodged. Simultaneously, either the Yellow Battlefield mechanic or exploding circles will appear.
Getting hit by the blue lines will cause the boss to gain 1 stack, as well as stunning the player (much like the wall).
Yellow Battlefield
After swapping or even starting the fight with the yellow cube, a wall will appear which splits the battlefield into halves, stepping into that wall will stun you for 5 seconds and it will grant the boss 1 stack buff.
The only way to cross that wall is by dashing through it (space bar).
Dash through the wall
Yellow Wipe Mechanic
2 giant orbs will spawn (at the green dot and the blue dots) if destroyed:
- When a player destroys an orb they will get a golden buff that allows them to block the projectiles.
- 4 purple diamonds spawn. They throw projectiles towards players.
- Another golden buff will be thrown away from the destroyed orb towards the cube boss, if taken it will give a golden buff to the player who took it and creates a golden circle on the floor.
4 players should take each side with a giant orb.
- Party 1 does the mechanic from the green dot side.
- Party 2 does the mechanic from the blue dots side.
Each circle should have
- A player needs to destroy the giant orb and immediately move close to one of the purple diamonds to block its floating orbs.
- Another player needs to stand in between the giant orb and the boss to create the circle with the stagger enhancement buff within melee range from the boss.
- After receiving the buff they should block the floating orbs from the other diamond.
- The 2 other players need to wait until the golden circle is created and then stand inside it to stagger the boss.
- Make sure that only two people are inside the circle or everyone inside it will get knocked back.
In summary, destroy the orbs, block the projectiles, stand in the circle and stagger the boss.
If any projectiles from the diamonds hit a player inside the stagger circle, they will get charmed, much like in Vykas.
- This means all projectiles should be blocked.
Red Cube
Color Change
Once the cube changes to red colour, it will shoot AoE explosions from the edges of the boss twice, to avoid this, stand in line with the boss’s vertices.
After dodging the explosions golden beads will appear all around the platform, all of them need to be collected.
- 1 player can collect as many beads as they want.
Golden Beads
A beam of light follows each player, a golden bead for each beam of light will then spawn and start moving from the outside ring slowly towards the cube. The beams move on the same path as the beams of light.
If a bead hits the boss it will gain one buff stack.
If a golden bead hits the player it will give them a stigma debuff, getting more than one stigma buff will instantly kill the player.
Keep a space between you and your teammates once you see the light beams to avoid overlapping and take one bead.
If there are 2 beads overlapping for some reason you have 2 options:
- Let it hit the boss and use Inanna later when the boss has more than x6-7 stacks.
- Take both beads and sacrifice yourself if the boss already has a high number of stacks.
Red Wipe Mechanic
The red cube will prepare a powerful laser attack towards a golden bubble that appears when this mechanic starts.
A prism will spawn at a random location, a player should take it and move into the golden bubble.
Once a player with a prism reaches the bubble they will be imprisoned.
The cube will then start channeling its laser attack towards that bubble and must be staggered to stop the attack, otherwise it will kill the players inside the bubble.
6 prisms in total must be collected and taken to the golden bubble, players without prisms should avoid the golden bubble.
Prisms Spawn Order
- 1 prism spawns followed by stagger.
- 1 prism spawns followed by stagger.
- 2 prisms spawn followed by stagger.
- 2 prisms spawn.
There are a total of 3 stagger checks during this mechanic.
Before staggering 2 red circle attacks will appear that need to be dodged, they will do very high damage.
Star Cube
Stagger Check
When the cube turns into a star, you will have to stagger the boss within a minute.

You can see how much time is left by looking at the dial circle around the cube on the floor, or by checking the buff below the boss’s HP bar.
If you fail the stagger, it’s a wipe.
Can use Wei if your party has low stagger, or if some people are dead
When changing to star cube:
- 4 blue AoE circles will spawn around the boss that will deal high damage and stun.
- Red lines will appear that need to be dodged.
After the stagger:
- Golden tunnels will spawn that need to be dodged.
- If a player stands in the tunnel, the boss will heal.
- Before the cube's colour changes, the blue AoE circles and red lines will appear again.
- The colour will change will happen immediately after the red lines explode.
During the 2nd and last star cube, the golden tunnels can be randomly spawned, player need to be aware and dodge.
Colour dependant mechanics
Velganos Pizza Beams
Octahedron shaped objects will spawn in specific locations depending on the cube’s color, much like with Velganos’ pizza, an indicator will appear, then lasers will be fired subsequently in its respective direction.
It deals normal/low damage but it pushes the player backward.
You can stand away from octahedron shaped objects altogether to avoid getting hit depending on whey they spawn.
Red Cube
Yellow Cube
Blue Cube
Star cube
Horizontal Laser Beams
A laser attack appears from above, moving around the battlefield in specific patterns depending on the cube’s colour. It pushes character back and deals high damage that must be avoided.
Red cube
Yellow cube
Blue cube
The lasers target three random players and follows them.
Star cube
Shapes Laser Engraver
Octahedron shaped objects will spawn in specific locations depending on the cube’s color and will start casting laser shapes on the ground that explode once they’re complete. It deals high damage and knocks you up.
Red cube
Yellow cube
Blue cube
Star cube
Orbs & Meteors
Various octahedron objects are summoned and will start casting pink tiny floating meteors that can target players or move in specific patterns depending on the cube colour.
Red cube
It’s recommended to aim it to the edges, to give more free space for others to dodge near the cube.
Yellow cube
When the colour changes this pattern can happen:
During this phase this pattern can happen:
Blue cube
Laser Of Death
It starts with a big blue telegraph indicator to show where the cube will cast his blue laser to imprison players. The cube will perform a powerful laser attack as soon as anyone gets imprisoned towards said player that does very high damage. It has 3 shapes depending on the cube color.
Blue cube
8 spheres appear around the cube, if taken by a player it will prevent the imprison status for 8 seconds, its effect will disappear as soon as you get hit.
Yellow cube
During the yellow cube fight, this mechanic will do the imprison wave to only one side, you will need to space through the barrier and run to the other side.
Golden cube
This one only happens twice and it’s a half circle shape.
Randomly happens with any cube:
This one can happen with any cube color, you will see it a lot after the red cube wipe mechanic. It happens x3 times all you need to do is to watch the empty area that has no blue attacks and run to it.
Imprisoned players have a contagious cube drawn around them that will imprison players inside it. Due to this, if a player cannot reach the safe spot, they should stay where they are so as to not spread the imprisonment, ping and wait for their team to free them.
Failing
Random notable mechanics
Laser Bombing
When the mechanic starts, indicators will appear showing you the safe spot around the boss in the form of rings. For shotcalling and memorising purposes they can be labelled with numbers starting from the inner ring (1) to the outer ring (3).
In case the cube is yellow, the mechanic occurs on 1 side only. You can safely run to the other side by using your space bar to pass the barrier.
Pattern 1
Pattern 2
Pattern 3
Pattern 4
Pattern 5
Square Targets
If you get marked by a square, stay away from your teammates because the squares will explode in a pattern that can knock you or nearby players back.
Pattern 1
Pattern 2
Counter Attack
2 red rays move clockwise around the battlefield gradually getting larger.
Much like in Valtan Gate 2, a counter attack can get triggered - if the boss receives a certain amount of damage, it will trigger three in-out AoE explosions that push everyone back. Do not attack the boss.
If no one attacks the boss during this mechanic, you still need to avoid the radius around the rays because they will explode regardless.
Fail
Success
Push Out
A gradually filling yellow indicator will appear and once it covers the whole battlefield the cube will perform an AoE push. Players need to be careful to avoid getting pushed to the outer ring, this can be avoided by using any push immune skill or by standing close to the boss.
Vertex Explosion
The cube will rapidly spin and red lasers will appear in ordinal position. They will explode after a couple of seconds, knocking out everyone in range. The safe spots are the vertices of the cube. Sometimes the cube changes its direction at the last second, so be careful.
Crystal Push
This is a random which deals a lot of damage and a big knock back to anyone who gets hit by it, there is always a safe zone to avoid getting hit by the attack.
Circle Explosion
Only during the yellow cube fight, a giant yellow circle with an orb in the center explodes in a certain order, these attacks will deal damage and knock you out if you get hit.
Cube Attack
2 waves of blue hologram cubes will appear, it deals a lot of damage and has a great knock back. The 2nd wave is always in the opposite position to the 1st wave.
After the 1st explosion, move to the exploded area to avoid the 2nd wave.
Crystal Explosion
A giant crystal shaped object explodes dealing a lot of damage and knocking back anyone hit by it.
Sidereals
Roster
During the Brelshaza Gate 4 legion raid, you will have the help of the following 3 Sidereals:
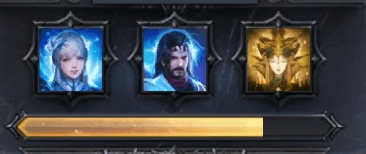
Nineveh (Ctrl + Z): Deals the highest damage.
Wei (Ctrl + X): Deals Stagger and some damage.
Innana (Ctrl + C): Creates a magic shield that grants immunity to stagger and knockbacks while partially absorbing damage and reducing certain stacks. When the shield disappears, it will restore the HP of all the players who are in it.
Optimal use
Nineveh can be used anytime if you’re confident in your party’s stagger and performance.
Wei should be used only during the Star cube stagger check if your party has low stagger.
Inanna should be used:
- To remove the (erosion & boss stacks) buffs.
- During the Star cube stagger check so players can freely stagger and remove their debuffs at the same time.
- Used when the boss has a lot of stacks or someone has 6~7 erosion stacks.