
Normal mode:
1500 gear score
Hard mode:
1550 gear score

Brelshaza Gate 2 Boss Guide
Overview
Introduction
Gate 2 of Brelshaza is slightly easier than gate 1-2 because Gunlancers and Destroyers are able to taunt the boss, and it only has 4 special mechanics.
Download our free Lost Ark Overlay to get this guide, cheat sheet, and more within your client. We highly recommend it if you're using a 2nd screen from browser.
This fight has many changes in Hard Mode.
You can find the changes in these mechanics:
Key Mechanics:
Random Notable Mechanics:
Full Video Guide


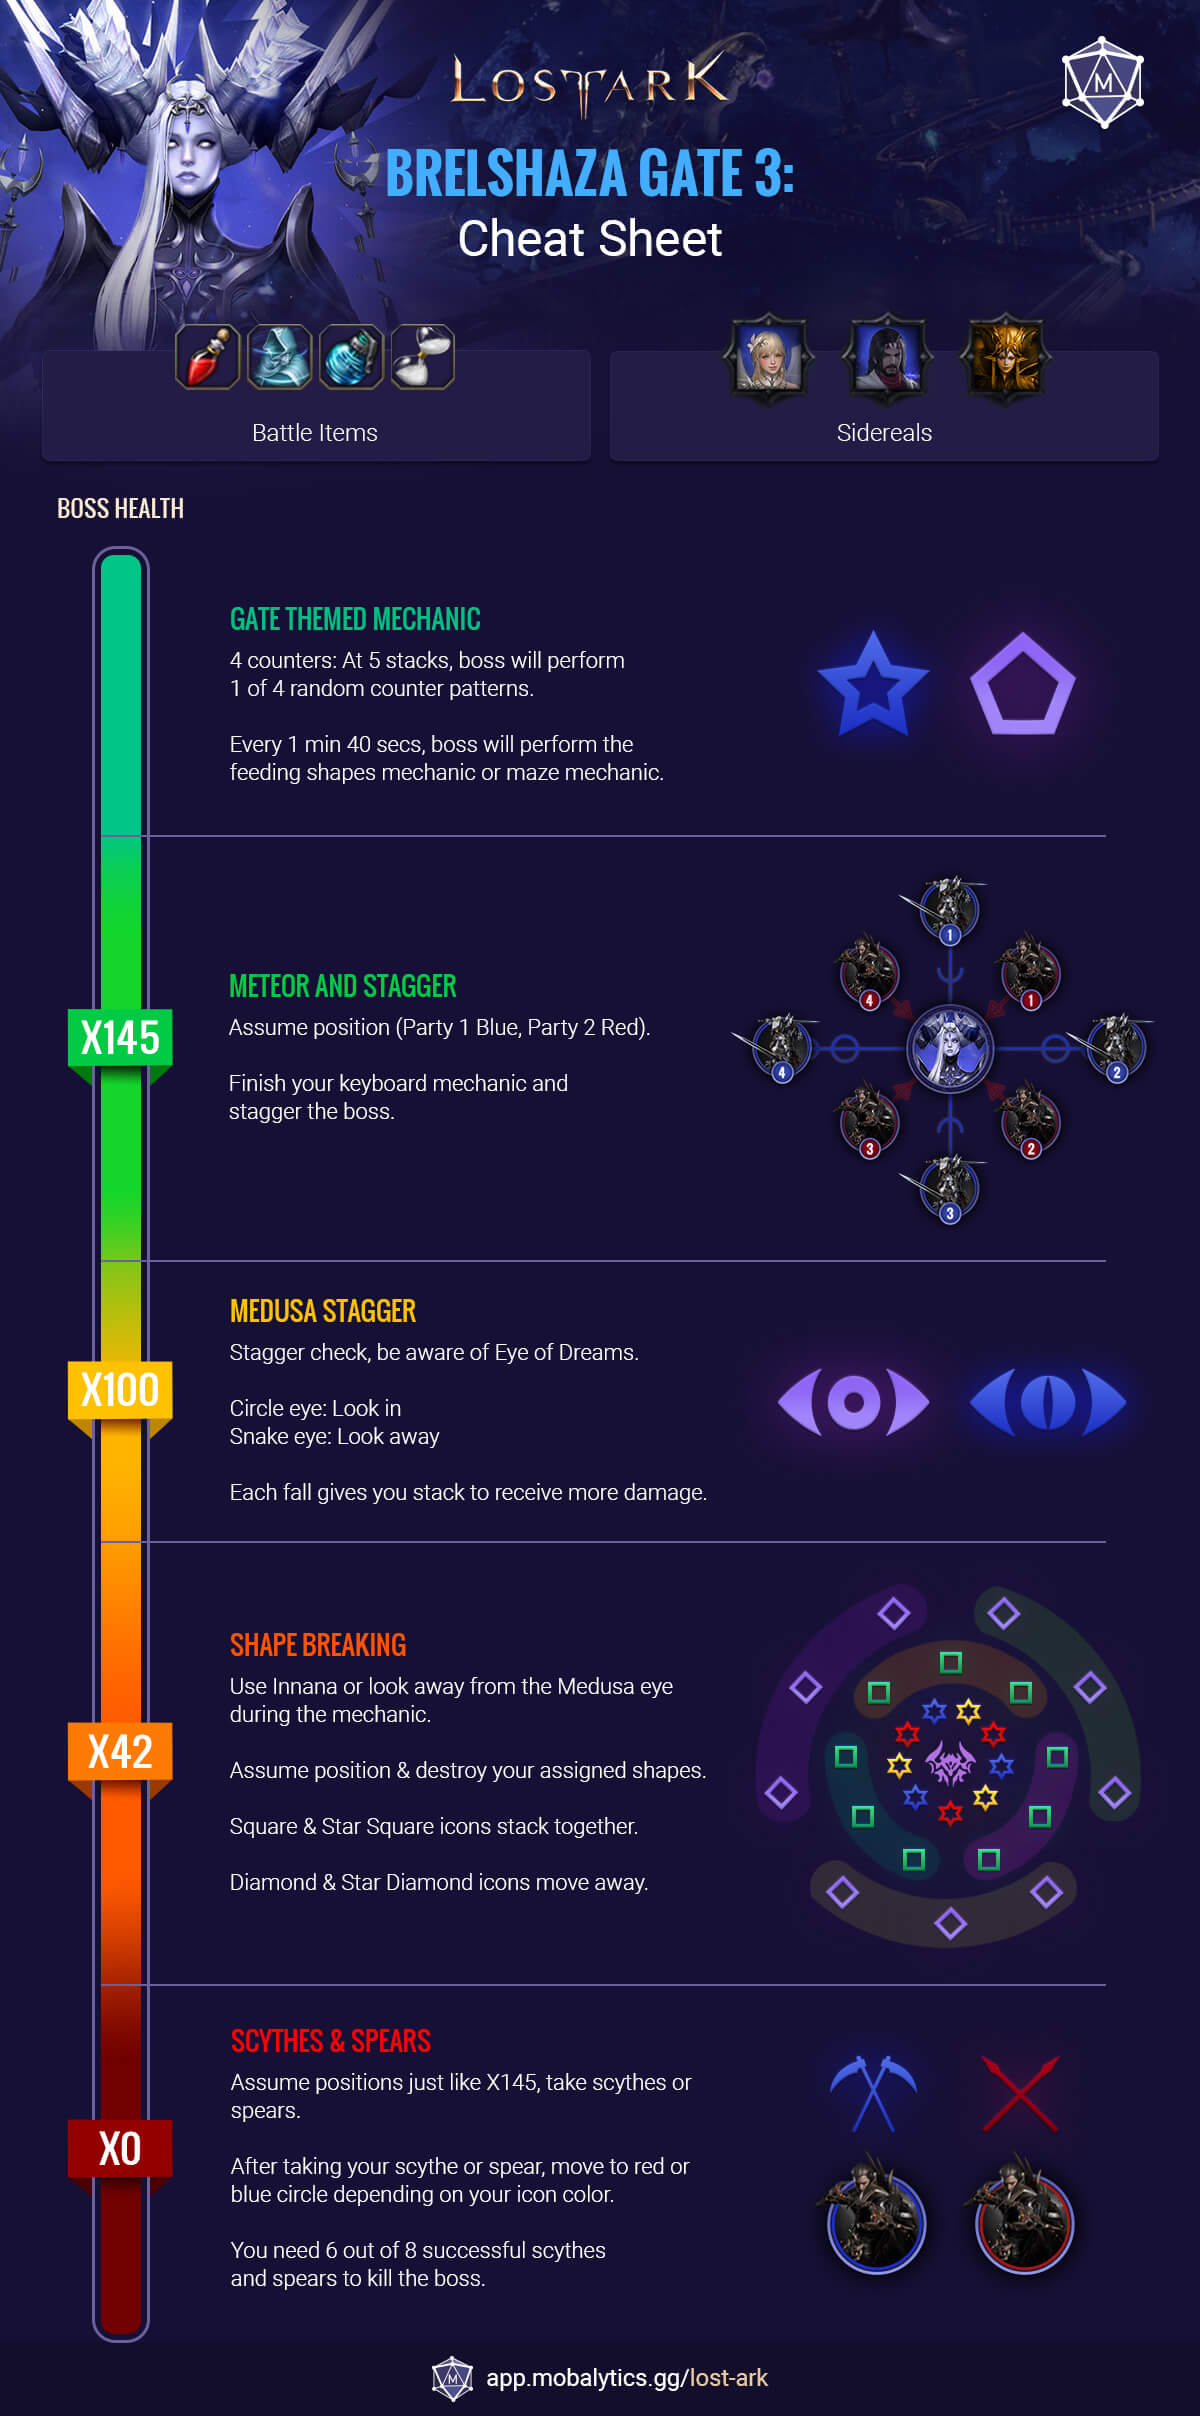
Cheat Sheet
Key Mechanics
Assigning Positions
Each party member should be assigned positions before starting the gate:
x145 and x0 require both cardinal and ordinal positions.
- You can set party 1 to NESW or x3.
- You can set party 2 to NE, SE, SW, NW or x3 + 1.
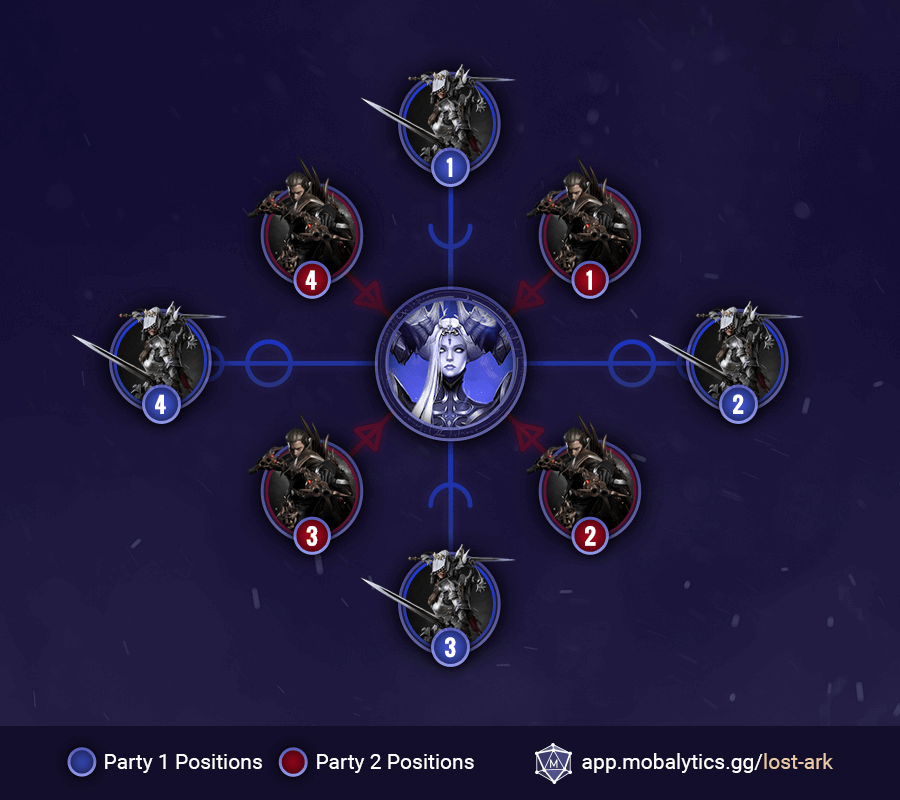
Diagram shows cardinal and ordinal positions.
x100 requires ordinal positions, for example.
- NE, SE, SW, NW
- x3 + 1
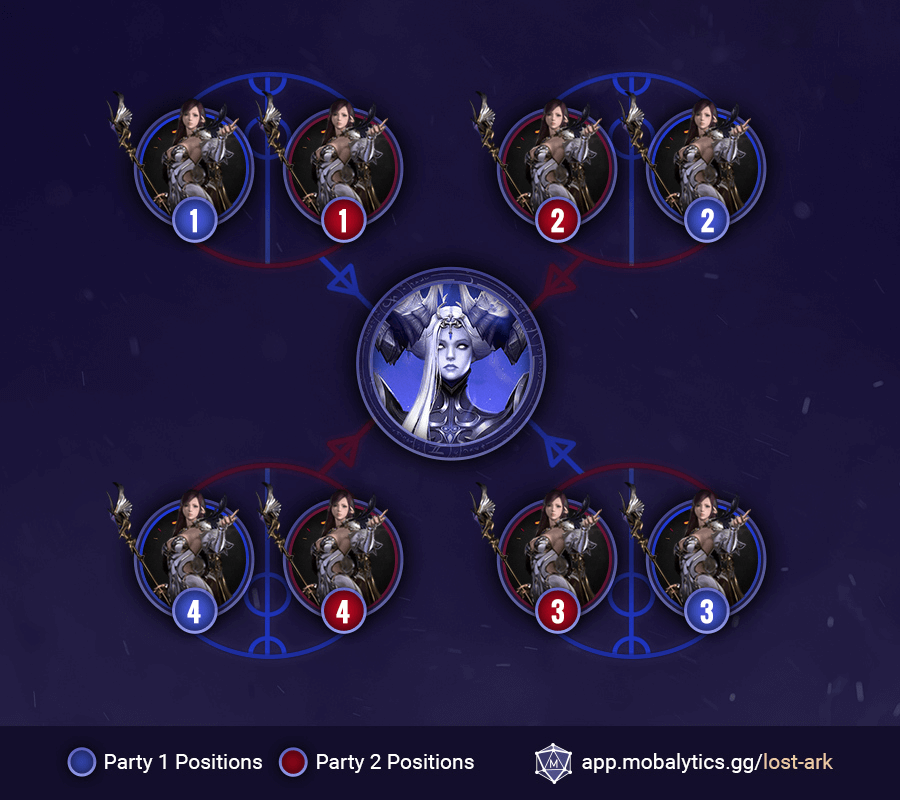
Diagram shows ordinal positions.
x45 is unique, and so will be specified in its explanation.
x145 - Meteor & Stagger
The boss gains a damage reduction buff and teleports to the center.
Meteors start to fall in 2 waves:
- The 1st wave of meteors falls in ordinal positions (11 / 1 / 5 / 7 o’clock)
The 2nd wave falls in cardinal positions (12 / 3 / 6 / 9 o’clock)
Once a player touches the meteor he will be locked in place and a typing mechanic appears on screen.
If a player fails the typing mechanic a big AoE will explode from his position and deal average damage to anyone around them.
Move to your assigned position, once you touch the meteor finish the typing mechanic. After succeeding, head straight to the boss to complete the stagger check.
An additional meteor is spawned after the 2nd wave of meteors.
x100 - Medusa Stagger
Boss teleports to the center and a stagger check commences. A sphere (Dream Eye) appears next to the boss that absorbs/releases energy.
If you look in the wrong direction, you get knocked back and it will give you a stack of a debuff that increases the damage taken from your next hit - with every fail you will get more debuff stacks which means more incoming damage each time.
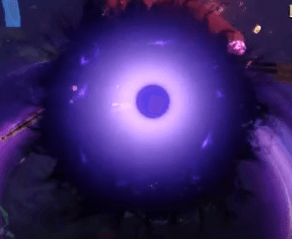
The True Dream Eye (Circular) absorbs energy, you must look at it during the stagger check.
The False Dream Eye (Snake) releases energy, you must look away from it during the stagger check.
Stagger the boss. Depending on the eye pattern, look at or away from the Dream Eye to avoid getting knocked back or killed.
If your party has low stagger, use Wei.
What Happens?
- Some yellow meteors will drop, each will have a + shaped explosion.
- Standing in the yellow meteors will grant a stagger buff to the player.
- Dream Eye now cycles between the Snake and Circular eye.
What To Do?
- If you're playing a good stagger class, take the yellow meteor for the buff.
- Same as Normal Mode mechanic, but be careful because the state of the Dream Eye will cycle.
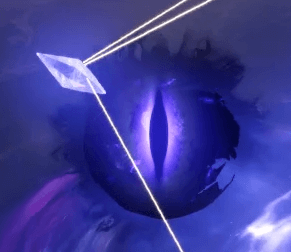
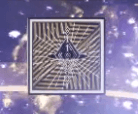
x42 - Shape Breaking
The Boss will teleport to the center, with a coloured animation around the boss and the field of view will increase.
A Dream Eye will appear in the center. You can use Inanna to avoid getting knocked back or debuffed from it.
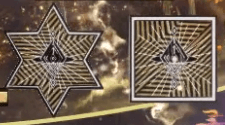
27 different shaped figures will appear across the map:
- 9 Stars
- 9 Squares
- 9 Diamonds
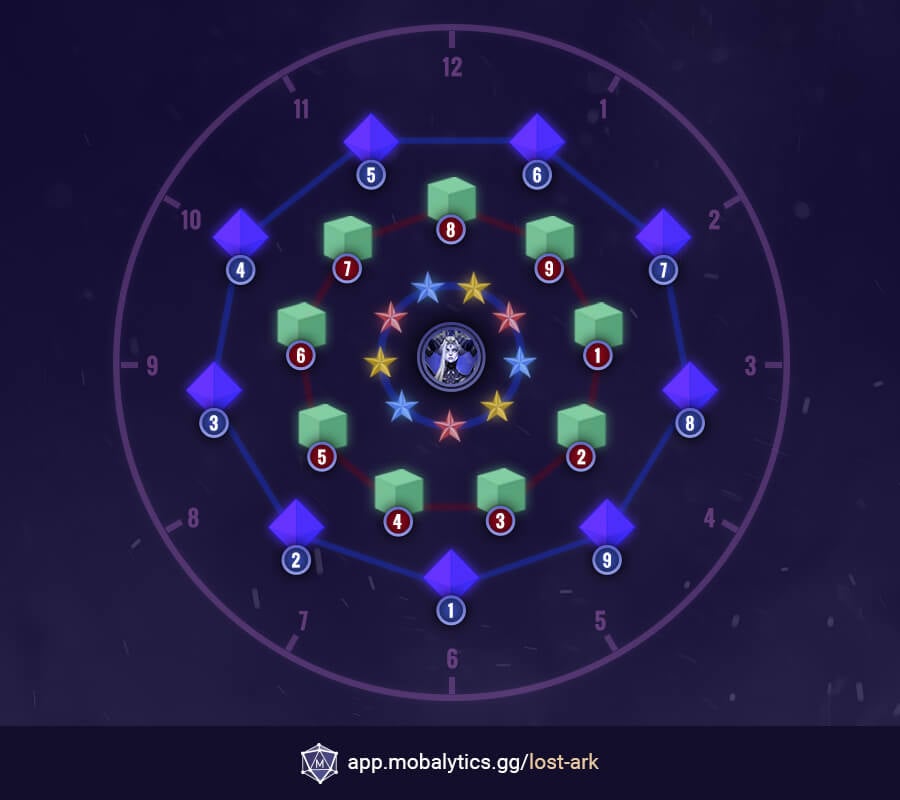
The goal for each player is to destroy 3 of the same shape in the position they were pre-assigned before starting the gate, except the 3 star shapes in the middle that match the boss animation color.
Two preassigned players should pick 2 colors. Player 1 takes blue and yellow stars and player 2 takes red and yellow stars. The two players assigned to destroy the stars in the center must destroy their colored star. Pay close attention and be careful to not destroy any other shape or wrong colored star.
- Player 1 destroys 3 yellow stars.
- Player 2 destroys 3 red stars.
The rest of the players should move to their assigned positions and destroy their 3 shapes.
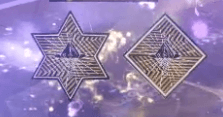
Assigning positions
- Classes with mainly large AoE abilities should be assigned in the outer range of shapes (Diamonds).
- Classes with mainly single target abilities should be assigned to deal with the inner range of shapes (Stars).
- Other 3 player are assigned to middle range of shapes (Squares).
This avoids accidentally destroying another players’ shape.
You need 3 stacks to survive this mechanic so if a player destroys an extra/wrong shape by mistake, the person assigned to destroy that shape will die due to not getting the 3 stacks. You do not have unlimited time to destroy 3 shapes, so do not wait too long to destroy your shapes as the timing can be tight and failing could wipe the raid.
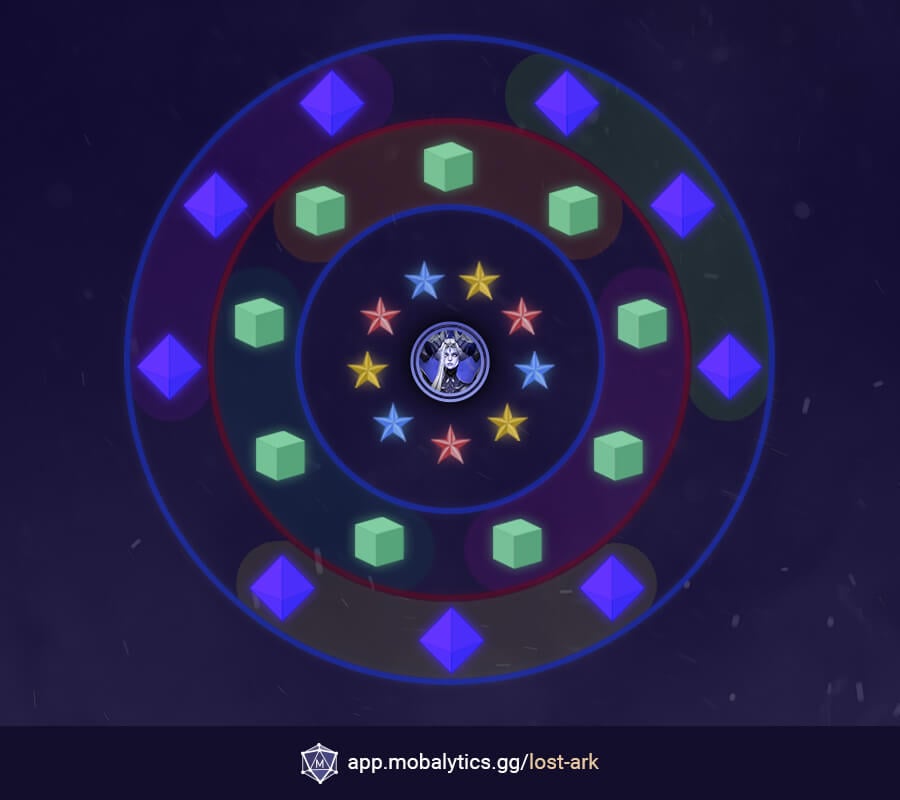
After successfully performing this mechanic
Every player will have a shape appear on top of their heads. Strings will form connecting nearby players in a radius around the first player to destroy their 3 shapes. Standing in the correct positions will grant a buff that will prevent the respective player's death.
Diamond shape destroyers will have:
The players with the Diamond should stay away from their teammates and each other.
Square shape destroyers will have
The players with the Square should group inside the circle with the other players that have a square shape.
The two players that destroyed the middle stars will have
The player with the Star + Square should group up with the other square shapes in the circle.
The player with the Star + Diamond should move away from everyone
Dream eyes will continuously spawn whilst breaking the shapes, 2 at a time.
Innana recommended
x0 - Scythes & Spears
The boss teleports to the center and starts performing her last wipe mechanic, 4 blue scythes and 4 red spears will spawn around the boss. You should keep the same positions as x145 Meteor & Stagger.
Once a player steps into a circle with a blue scythe or a red spear they will get an icon buff on top of their head depending on the circle they stood in.
Circles with either a scythe or spear appear in a fixed position, each player should stand in their pre-assigned position until the scythe/spear disappears to receive their respective buff.
A few seconds later, 4 circles will gradually appear in random positions for both the scythes and the spears, meaning 8 circles in total.

Each circle obtained will add a stack to the boss, you need to a minimum of 6 stacks, you can get 4 from each type.
When a circle with a scythe or spear appears, a player with its type should stand inside the circle until the scythe/spear disappears to add a stack to the boss.
The stacks obtained are displayed below the Boss’ HP bar.
Failing this mechanic
Failing to get 6 stacks will result in a high damage aoe. You can use or shielding and damage reduction to survive.
After the aoe, you should just kill the boss, this mechanic will not repeat.
Dream Eyes will spawn in the middle at random.
You can skip this mechanic by using to avoid the last attack.
Innana can be used to perform the mechanic whilst ignoring the eyes.
Counterable Mechanics
Introduction

Every time the Gate 3 boss reaches x5 of Token of Dreams buff she will perform one the following counterable mechanics.
Linear Scythe Roll
The boss will randomly target a player and teleport next to them, throwing out her scythe in a straight line.
She will then throw her scythe again in the same position, this time an additional scythe is thrown next to the scythe in the middle - stay away from the pink sections as these are where the scythes are thrown.
If the cruel cutter scythe hits the player, it will push him back then forward dealing a lot of damage.
Hashtag Scythe Roll
The boss will randomly teleport next to a player, summoning a few clones across the battlefield diagonally and horizontally. They will throw scythes just like in the Cruel Cutter mechanic, stay away from the pink sections.
Series Of Stabs
The boss will teleport behind a random player, she will summon 8 shadow clones that will appear around the boss poking their spears inwards towards the boss, staggering & dealing damage to anyone inside that circle.
In other words, outside safe.
Dash Slash
Similar to the previous mechanic, she summons clones that attack in a straight line directed outwards from the boss. They deal a lot of damage and the final hit will cause a knock up.
Random Notable Mechanics
Maze Of Illusions
Every 1 minute and 30 seconds this mechanic happens (shared cooldown with Feeding Shapes mechanic).
- The boss teleports to the center and all players are silenced. A maze will appear on the battlefield.
- A golden circle debuff will be inflicted onto 1-3 random players and a golden circle safe spot will appear at the edge of the battlefield which will also appear on the minimap as a yellow dot.
- A red indicator starts gradually appearing from the inner circle from the boss to the outer circle causing explosions.
- Touching the maze walls will both stagger and push players back.
- The players with the golden debuff must move to the golden safe spot on the edge.
- The rest of the players need to stand in between the gaps of the maze walls at the very edge of the battlefield.
If done successfully, everyone will survive and the raid continues.
If 1 or more players with the golden debuff didn’t stand in their safe spot, the entire raid will enter a mind control state that makes them lose control of their characters for 5 seconds (much like the charming state in Vykas gate 3).
3 Spears will now spawn, failure to get them to the safe spot will turn players hostile.
Feeding Shapes
Every 1 minute and 30 seconds this mechanic happens (shared cooldown with Maze of illusion mechanic).
The boss teleports to the center and temporarily inflicts darkness on the entire raid.
One of 2 shapes randomly appears on the boss (Pentagon or Star).


Afterwards, both of these shapes will appear across from each other with the boss in between them - the same shape will not always be on the same side.
You will need to lure the shape that matches the shape on the boss until it hits the boss. This will cause 4 circles to appear that grant an invincibility buff.
When a player gets close to a shape, the shape will start following them.
The matching shape should be lured to the boss, and the other shape should be kept away from the boss until it disappears. If you take one of the shapes, you will receive a lot of damage. If you take the matching shape, the circles won’t appear and no one will receive the buff.
When it’s done correctly 4 circles will appear in ordinal position (11 / 1 / 5 / 7 o’clock) to get the invincibility buff.
Exactly two players must stand in any circle to get the buff, if any more or any less stand inside the circle the buff won’t be granted.
Avoiding a wipe
If the previous part of the mechanic fails and the circles don’t spawn, or if a player doesn’t get the buff, it is possible to still survive this mechanic by using .
The boss will always cast 5 waves that deal damage. In order to this mechanic, you should wait until the 1st wave is cast then use to avoid the remaining waves - the 1st wave does much less damage compared to the others so it can be tanked.
Of course, if you have the buff the waves won’t affect you and you can continue to dps.
4 shapes will now spawn instead of 2.
- 2 must be given to the boss instead of 1.
- 2 musn't be given to the boss.
You can still use .
Basic Attack Patterns
Whirlwind
A blue indicator will appear around the boss and she will start spinning. Once she stops spinning the attack is followed up by a last spin that knocks up players in range.
Melee classes should keep their distance, ranged class can use this as a window to deal damage.
Rooting Pool
The boss will charge her spear causing circles to appear around the boss. 2 seconds later a spear will hit each circle causing a small explosion.
If a player is hit by a spear they will be imprisoned. Dodge the spears and free those who are imprisoned.
Lily Pad Explosion
The boss will raise her spear above her head and start spinning it, a laser beam will start moving outwards from her. Explosive lily pads will appear in the laser’s position that deals damage and knocks up players in its way.
Stay away from the lasers to avoid them and the lily pads.
Inside/Outside Smash
The boss will hold her weapon and start charging a big AoE attack
- If it’s a scythe, the area in front of her will be pink, this means the safe spot is inside that and the AoE damage is outside.
If it's a spear, the area in front of her will be blue, it means the damage will be inside that blue circle and you should move away.
In other words, pink means inside safe and blue means outside safe.
Scythe attack
Spear attack
Hail Attack
Two laser lines will appear across the whole battlefield in either a parallel or crossed pattern. An outward wave will appear from each laser, serving as an indicator. Explosions will then appear moving in the direction of the waves.
Parallel waves
The boss will cast the lasers in parallel to each other.
Move to the middle.
Crossed waves
The boss will cast the lasers in a cross pattern, pay attention to the direction of the waves.
Move to the safe quarter.
Black Holes
The boss fires 4 black holes in ordinal positions, it explodes after a while, knocking up and damaging players in its range.
Stay away from the ordinal positions.
After x85 she will cast 4 extra black holes that follow 4 random players.
Floor Drawing
The boss fires a laser that draws patterns on the floor. The shapes formed then explode, dealing a lot of damage and knocking players up.
Stay away from the shapes.
Scythe Charge
The boss’ shadow will dash forward and the boss herself will dash to it 3 times.
The starting point is always the ending point so don’t chase the boss.
Sidereals
Roster
During the Brelshaza Gate 3 legion raid, you will have the help of the following 3 Sidereals:

Nineveh (Ctrl + Z): Deals the highest damage.
Wei (Ctrl + X): Deals Stagger and some damage.
Innana (Ctrl + C): Creates a magic shield that grants immunity to stagger and knockbacks while partially absorbing damage and reducing certain stacks. When the shield disappears, it will restore the HP of all the players who are in it.
Optimal Usage
Nineveh can be used when the boss is countered after the x5 stack mechanics:
- Red/blue orbs
- Whirlwind
- Lilly pad explosion
- Black holes
- Floor drawings.
Wei can be used during the x100 stagger check
Innana can be used during the x42 shape destroying mechanic.