
Normal mode:
1490 gear score
Hard mode:
1540 gear score

Brelshaza Gate 1 Boss Guide
Overview
Introduction
Brelshaza is the fourth Legion Raid in Lost Ark. Gate 1 requires players to be 1490 item level to enter. The fight is split into 3 different phases, each having their own unique mechanics and normal patterns.
Download our free Lost Ark Overlay to get this guide, cheat sheet, and more within your client. We highly recommend it if you're using a 2nd screen from browser.
This fight has a few changes in Hard Mode.
You can find the changes in these mechanics:
Full Video Guide


Cheat Sheet
Introduction
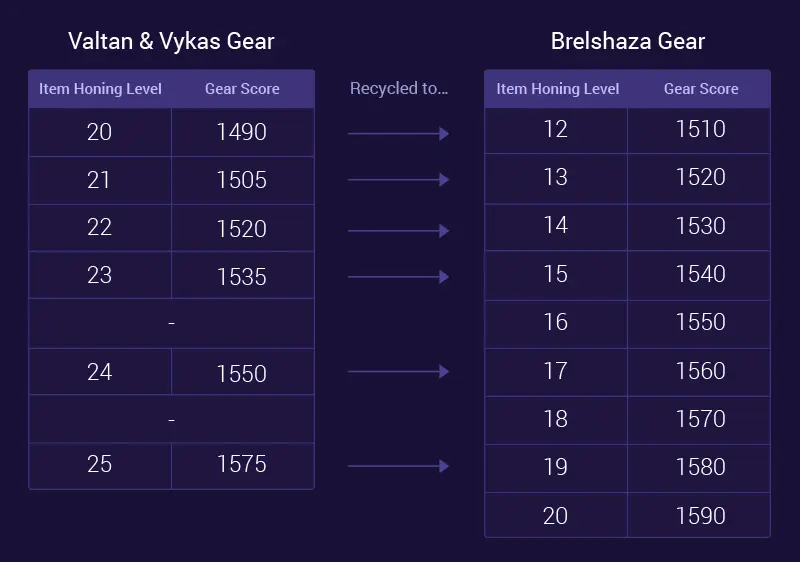
Brelshaza Gear
- Brelshaza legion raid rewards allowing you to craft new relic type gear sets can be honed up to maximum +20.
- Recycling from the current relic gear to the newer relic gear will increase your overall item ilvl by 3.33 item level per item.
- Set effects are the same as the previous relic sets from Valtan & Vykas.
- The new gear requires new honing materials that can be dropped from brelshaza Raid, Chaos dungeon and Caliligos the new guardian raid.

To craft Brelshaza gear you need the following:
- Weapon: x100 of Brelshaza horns.
- Armor : x40 of Brelshaza horns per item.
Phase 1
Introduction
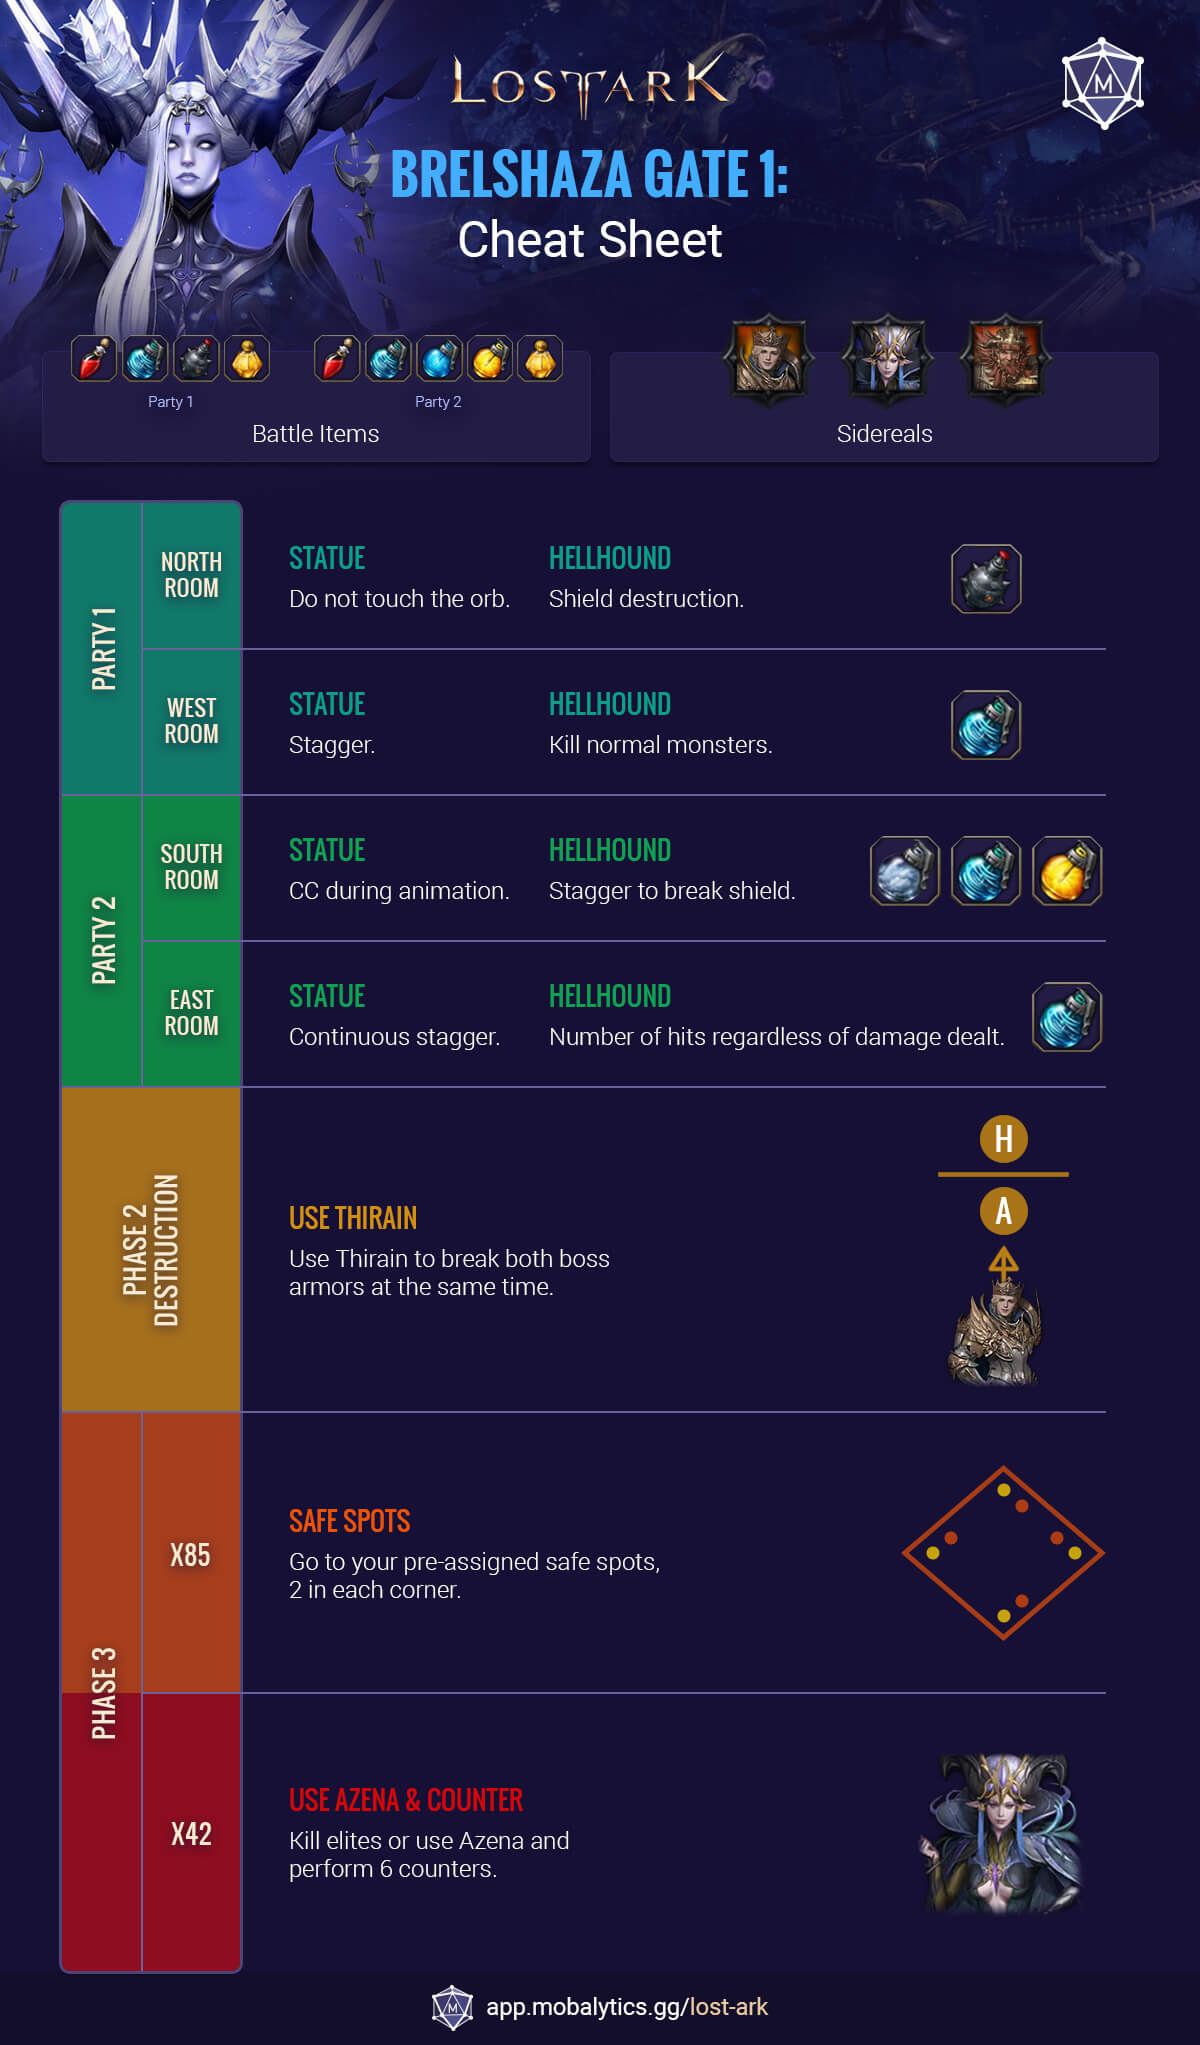
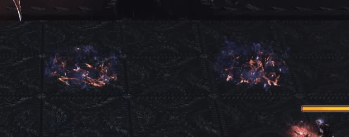
The battlefield is split into 4 chambers, each having their own set of mechanics.
The whole raid will split into groups of 2, so 4 groups in total. After these 4 chambers are finished, the battlefield will lose 2 walls and become only 2 chambers.
Once you finish the hellhound in your room, and the other rooms are still fighting their hellhounds, you will still need to do the statue mechanics.
Breath Of Light
What Happens
Every few seconds blue and red squares that deal damage, one square that is golden and few remaining normal non-colored squares will appear on the ground. Golden square always appears in the center of blue tiles.
What To Do
Stand in the golden colored square to gain buff that increases your abilities.
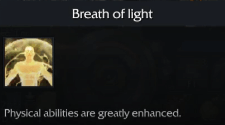
If you cannot reach the golden square then simply stand in any normal squares to avoid damage.
North Chamber
What Happens
- Statue - Periodically summons an orb that follows one random player. If a player touches the orb it will explode and deal massive damage to all 8 players.
- Hellhound - Has a shield that requires destruction/weak point to be removed.
What To Do
- Statue - If the orb is following you, keep luring it away from your teammate and DO NOT TOUCH IT. The orb disappears after a while.
- Hellhound - Use destruction bombs and destruction/weak point skills to break the shield before you are able to kill it
West Chamber
What Happens
- Statue - Charges AOE every 15 seconds that requires stagger to stop
- Hellhound - Spawns 25 normal mobs
What To Do
- Statue - Whenever stagger bar appears, throw whirlwind grenades and use stagger skills to prevent the AOE attack. If you fail to stagger all 8 players will get feared for a few seconds.
- Hellhound - Kill 25 normal mobs that run around the chamber to remove the shield, then kill the hellhound, you can see how many required mobs left by checking the HP bar of the hellhound stacks buff.
East Chamber
What Happens
- Statue - Charging a debuff every 15 seconds that can stack
- Hellhound - Has a shield that requires constant multiple hits to break it's shield.
What To Do
- Statue - You need to continuously stagger the statue to remove the debuff by rotating whirlwind grenades and using stagger skills.
- Hellhound - Use normal attacks to break the shield, then kill it.
South Chamber
What Happens
- Statue - Every 15 seconds it charges darkness AOE
- Hellhound - Has a shield that requires stagger
What To Do
- Statue - Use hard CC skill (stuns,freezes etc) or throw CC grenades (sleep, stun, freeze grenades) during the animation to prevent it from casting
- Hellhound - Normal stagger skills and whirlwind bombs to remove the shield, then kill it.
Phase 2
Sidereal Thirian Destruction
After each team of 2 successfully kills the hellhound in their own chamber, the teams of 2 reunite with their corresponding party and fight 2 different bosses on each side separated by a wall in the middle. Both of the bosses require destruction.
What Happens
Each party fights a different boss. Party 1 fights Hammer boss, party 2 fights Arrow boss. Although there are no wipe mechanics, there are several high damage patterns players should be aware of during the whole fight and the main thing to do is breaking their armor by using destruction bombs and skills with weak point.
What To Do
Both parties need to stand close to the wall and align both of the bosses. Raid leader will then use Sidereal Thirian that goes through the wall and across the whole map to deal damage and break armor on both of the bosses.
When one of the bosses HP reaches 0, it will be staggered, if the other boss reaches 0 within few seconds as well, you will be able to move to the next phase.
If the both teams failed to kill their boss at the same time, the 1st killed boss will recover some of his HP (2 bars of HP) back, but the other boss will take additional damage.
Blue Square Waves
What Happens
Periodically, blue square waves will move across the map that knock and deal high damage when hit. Sometimes it has a very random pattern.
What To Do
Pay attention to how the waves move and dodge.
Phase 3
Fire And Blue Squares
What Happens
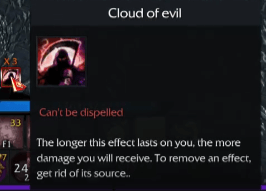
During the fight, some tiles will be occupied by electric clouds, if the boss smashes this field with his hammer, nearest tiles will explode and additional tiles will keep exploding along the path.
What To Do
If the electric clouds are left alone for a while, it will turn to a purple tar that will not go away and it deals a lot of damage if you step on it.
To avoid creating additional tar tiles, you can stand on the electric cloud tile and receive about 3 tick damages to activate the + wave on purpose and the electric cloud will be removed.
x85 - Safe Spots
After successfully getting both bosses killed, they will combine into one boss and this is where the real fight begins. Hammer boss is the front and Arrow boss is the back.
What Happens
Boss teleports to the center and starts charging a wave of damage that instantly kills everyone.
What To Do
Pre-assign positions for each player before the fight or simply use the North, East, South and West technique from Argos Phase 1, where players 1 from each party take North, players 2 take East, players 3 take South and players 4 take West safe spots. Safe zones can be spotted on minimap as small yellow dots.
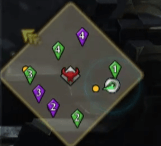
First safe spots will appear at 12 and 6 o'oclock, when both platforms are stepped on, the 3 and 9 o'clock platforms will appear
When 2 additional players step on the 3 and 9 o'clock platforms another set of platforms will appear at 12 and 6 o'clock, you need to repeat this until each player occupy 1 safe spot platform.
When you stand on the yellow safe spot, you will receive a shield buff that will save you from the kill damage the boss will cast.
Note:
Don't move from your safe spot until the boss casts the damage wave.
What Happens?
- The Boss will initiate a stagger check.
- Afterwards, the same Safe Spots mechanic will start.
What To Do?
- Stagger the boss
- Do the Safe Spots mechanic like in Normal Mode.
x42 - Counter Mechanic
What Happens
Boss teleports to the center and prepares for a counter mechanic, while spawning 4 elite mobs at 12 3 6 and 9 o’clock and a few normal mobs to distract and stagger players during the fight.
What To Do
Your goal is to successfully counter the boss 6 times in a row. Pay attention to where the boss is facing as only the HAMMER SIDE is counterable and he will spin a lot during the 6 counters.
Fail tolerance: 2 fail counters allowed, 3rd fail will wipe.
There are 2 methods to successfully pass the mechanic:
- Method 1 - Assign 4 players to 12 3 6 9 positions to kill and destroy the elite mobs that spawn, while other 4 players are surrounding the boss at the center ready to counter. Once elite mobs are killed those 4 players quickly join in the center to help with countering.
- Method 2 - Use Sidereal Azena as she will automatically target every single elite and normal mob on the map and kill them instantly, while everyone else surrounds the boss and prepares to counter.
Players who succeed the counter also will receive a debuff where a series of lightning will strike his position, these lightning attacks will damage and paralysis you, so it's important to stay away from your party member after a successful counter.
The 1st counter is always at 5 o'clock position but afterwards he will be consistently rotating around to fake out the players.
Pay attention to the hammer boss, once he rises his hammer you can start countering immediately.
What Happens?
- The boss will instead spin 3 times before initiating a counter.
- If a player counters, they cannot cast until the mechanic ends.
- Blue ghosts spawn that shoot arrows towards the boss that slow the party unless intercepted.
What to do?
- Intercept the arrow from the blue ghosts to avoid slowing the party.
- Typically, after countering the boss you should intercept the arrows as you cannot cast again.
Basic Attack Patterns
Arrow Waves
Boss holds his arrow and shoots in a cross wave shape followed by 4 big blue circles that deal a lot of damage.
Safe spot is the diagonal side from the boss’s front side.
Arrow Portals
Boss charges an arrow through a portal and each player will be targeted with a small portal. Few seconds later an arrow will hit the player.
Simply dodge by just moving away from the portal targeting you.
Rapid Arrow
Boss will target 1 player, shooting 5 arrows rapidly towards him, dealing a lot of damage.
Move around to dodge all the arrows
Arrow Spin
Boss will lick his arrow and perform a massive spin that deals AoE damage to players nearby.
Safe spot is standing very close to the boss.
Hammer Spin
Boss will lightly smash the ground with a hammer and perform a massive spin that deals AoE damage to players nearby.
Safe spot is standing very close to the boss.
Hammer Wave
Boss holds his hammer and targets a player shooting 3 fire waves that deal massive damage.
Easy way to dodge is by stepping aside.
Hammer Smash
Boss will target a player and smash his hammer 3 times, staggering and dealing massive damage to the player.
Dodge it by moving far away from the boss.
ShowTime
Boss will aim forward and start shooting fire waves from his hammer side and arrows from his opposite arrow side.
Move around with the boss to avoid the damage.
After the rotation finishes, it will slash afterwards, safe spot is where the spear is after the rotation.
Spin And Rain
Boss smashes the hammer in front then does the big AOE spin, followed up by arrow rain from the top.
Stay close to the boss to dodge initial spin, then quickly dash away as the arrow rain targets each player.
Backstep And Spearshot
Boss swipes, backsteps and throws a spear on a random player. Where the spear landed generates a small AOE that can one shot.
Simply move away from the spear before it explodes.
Arrow Rain
Boss shoots arrows in a spiral pattern that explode after a short delay on the ground.
Simply stay away from the spiral pattern.
Counter Patterns
Hammer Counter
Boss charges forward and prepares to dash while turning blue.
Counter the boss otherwise he will dash forward.
Sidereal Usage
Roster
During the Brelshaza Gate 1 legion raid, you will have the help of the following 3 Sidereals
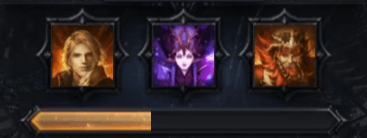
Thirain (Ctrl+Z): Deals the highest damage and destruction.
Azena (Ctrl+X): Deals AoE damage all over the battlefield..
Balthorr (Ctrl+C): Creates a AOE on the floor, granting everyone inside a defensive buff that lasts for 30 seconds. This buff can prevent certain wipe mechanics.
Optimal Usage
Recommended usage for Brelshaza Gate 1:
Thirian when you enter Phase 2 line up both bosses and destroy their armor
Azena at x42 Counter Mechanic to kill 4 Elite Mobs
Balthorr at x42 Counter Mechanic during the counter mechanic if your party is struggling with counters to increase the fail tolerance by 1.