
Normal mode:
1580 gear score
Hard mode:
1600 gear score
Akkan Gate 1 Boss Guide
Overview
Introduction
This is the first gate of the Akkan Legion Raid. It can be broadly broken down into 3 phases.
Full Video Guide


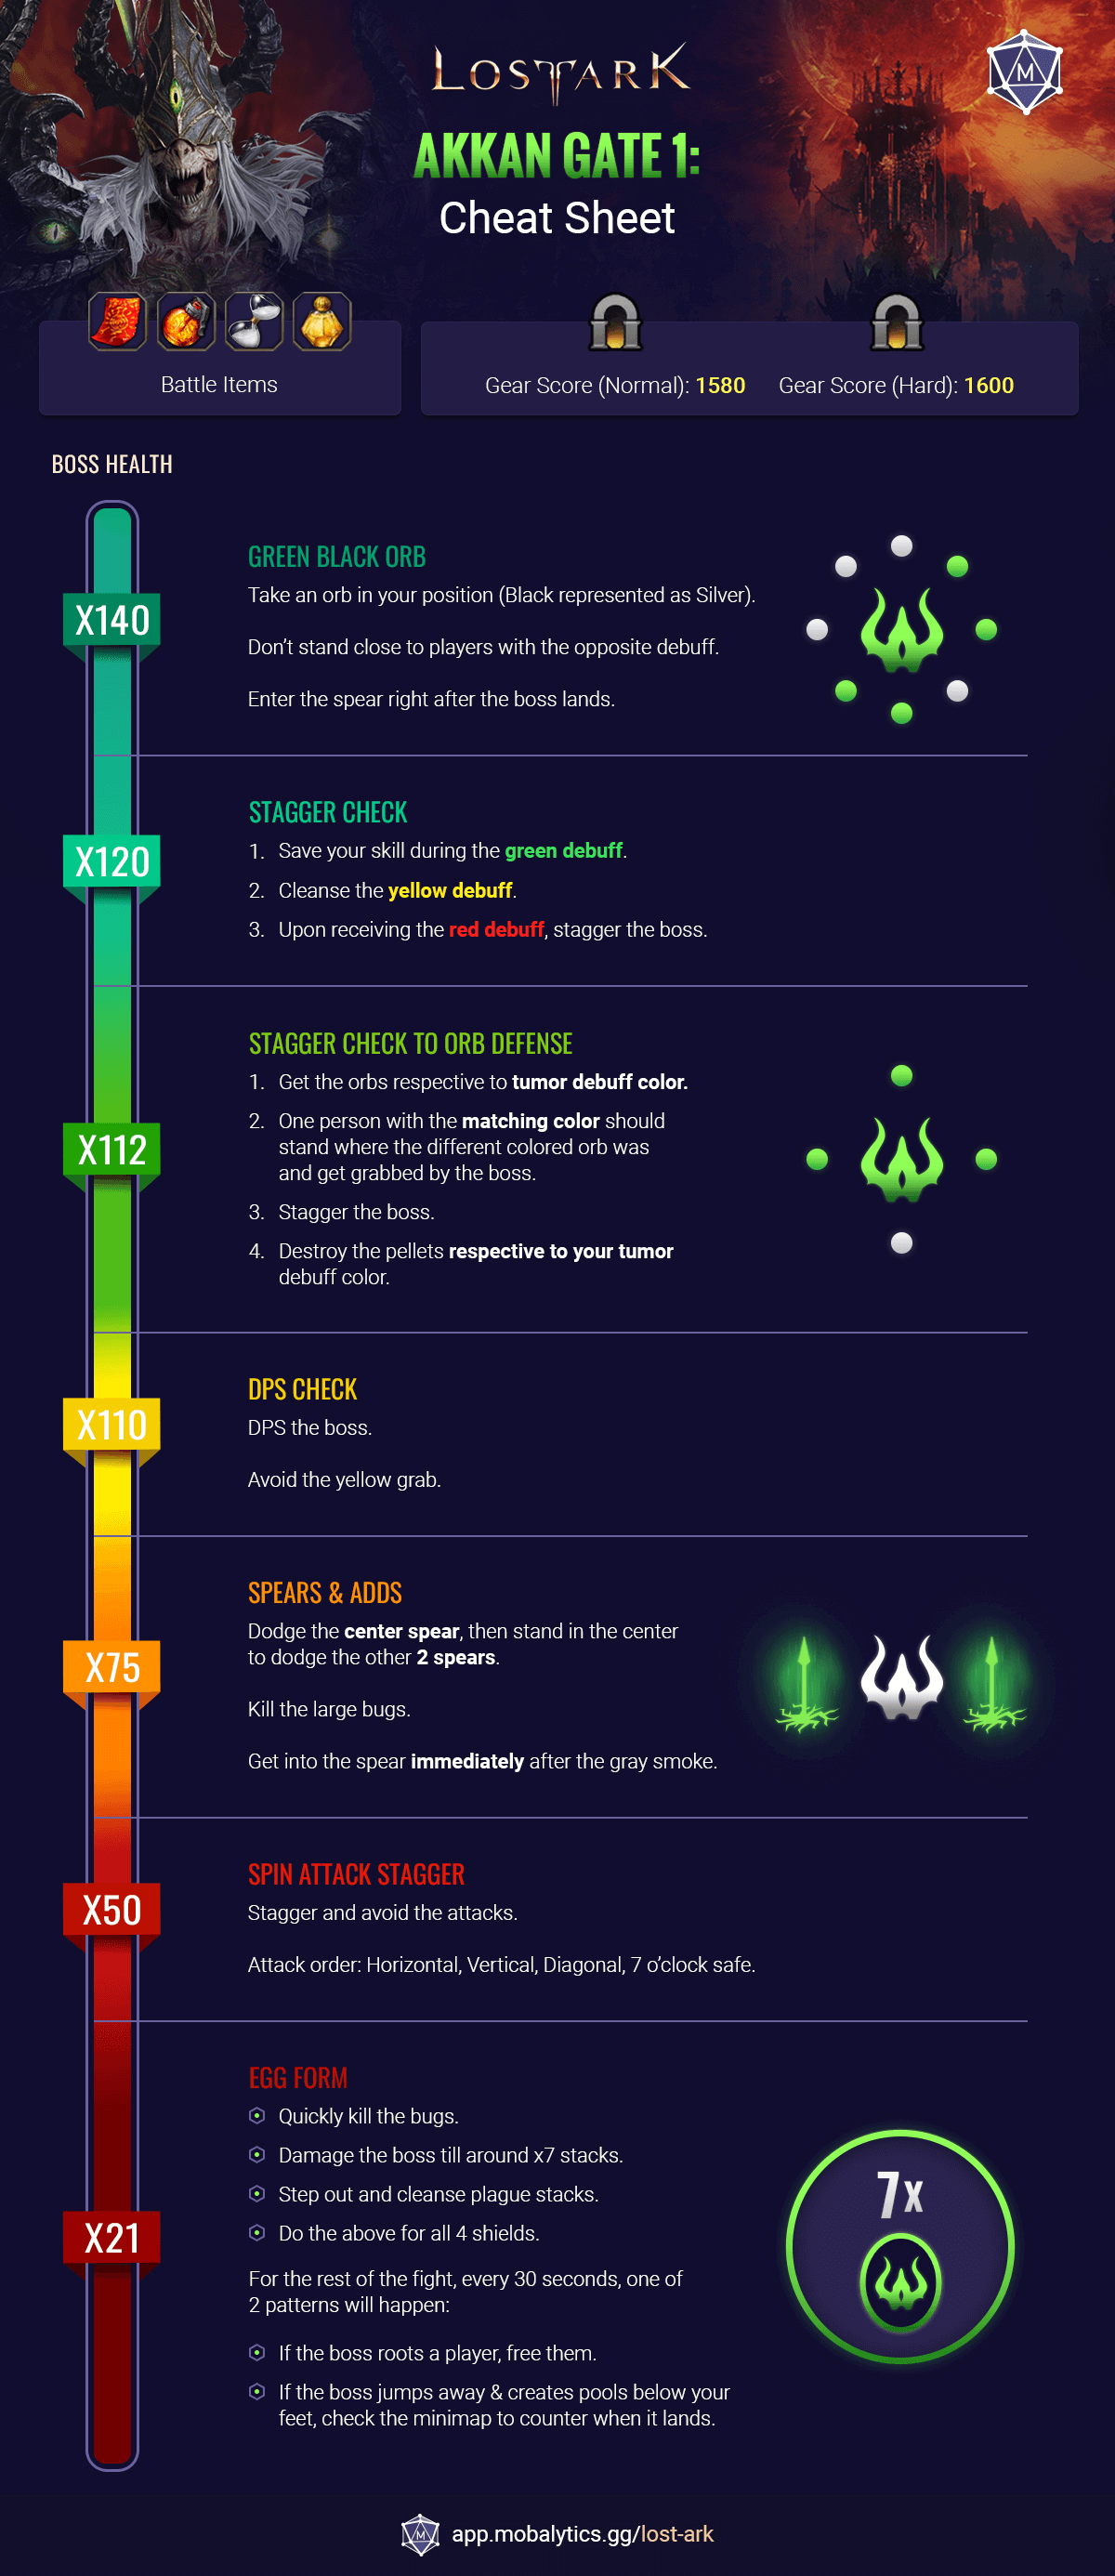
Cheat Sheet
Phase 1 | Major Mechanics
x140 Green Black Orbs
- The boss jumps to the center
- 4 green and 4 black orbs spawn at cardinal and ordinal positions
- Destroying an orb grants a tumor debuff
- Players with the opposite buffs inflicts a cleansable plague debuff
- up to 10 stacks
- causes a DOT effect
- Taking 2 different orbs will cause this debuff to stack infinitely
- Any remaining orbs will explode and trigger a map-wide tumor debuff of that colour.
After the orbs:
- 1 or 2 spears will drop from the sky.
- The boss lands at a random time with a delayed explosion
- Stepping on a spear will grant petrify the player, granting them immunity to the boss' explosion.
- Stepping on a spear will also deal continuous % based damage.
Each player should take an orb in their position, there must be no orbs exploding.
Players with opposite debuffs should not stand close to eachother to avoid getting stacks of the plague debuff.
Players should enter a spear after the boss lands to avoid the upcoming explosion.
Supports should prefer to use their awakenings after leaving the spears/ after the explosion.
x120 Stagger Check
The boss will yell and start gathering energy, commencing a stagger check.
An uncleansable yellow debuff will appear for 2 seconds followed by a cleansable yellow debuff.
Cleansing the yellow debuff will grand an uncleansable red buff that will allow stagger to be dealt.
- Save your skill during the green debuff
- Cleanse the yellow debuff, panacea or sacred charms can be used.
- Upon receiving the red debuff, stagger the boss.
Wei can be used.
In Normal, this mechanic can be skipped by using a , or support awakening + damage reduction.
x112 Stagger Check to Orb Defense
The boss will jump away and spawn 4 orbs in cardinal positions, there will be 1 orb with a different colour.
In Normal, only 1 orb spawns.
The orbs should be taken by the matching tumor debuff colour.
The boss will then jump and charge a grab at the position where the orb with the different colour was and start a stagger check. If no one gets grabbed, it will cause a wipe.
The boss will then spawn many pellets, destroying 3 of the incorrect colour respective to your tumor debuff will cause instant death.
- Get the orbs respective to tumor debuff colour.
- One person should stand where the different coloured orb was and get grabbed by the boss.
- Stagger the boss.
- Destroy the pellets respective to your tumor debuff colour.
Innana can be used to cleanse the debuff that kills a player if they destroy 3 incorrect pellets. Innana will clease the debuff 1 stack per tick, this means that you still need to be careful to not get 3 stacks.
x110-90 DPS Check
The stage will start flooding and the boss' HP needs to be reduced to 90 bars within 1 minute.
The water flooding the stage can obscure the red indicators, pay attention to the boss' animations.
DPS the boss.
Avoid the yellow ring grab, getting hit will disable you for the rest of the DPS Check.
Post-DPS Check
Press G on top of the indicator to jump to the next area.
The first person to move to the next area will be able to see a debris animation appear onto one of the staircases, climb the staircase that didn't have debris.
When everyone reaches the top, don't instantly jump. Wait for the water to reach the top of the nearest marked platform you can jump to, this will skip unnecessary mechanics.
Phase 2 | Major Mechanics
Falling Off the Edge
Getting hit by yellow indicators close to the edge may knock you off the battlefield.
If you get knocked out, complete the minigame to get back up, failing to do so will result in death.
Minigame:
Spam space until the bar reaches the top, if the bar turns purple the minigame will change to a timing minigame.
x75 Spears & Adds
- The boss throws 2 spears upwards and jumps
- The landing spot is the red indicator in the center of the battlefield.
- Two spears then drop, spawning bugs.
- If a large bug gets to the center, it will wipe
- The boss then charges an attack, the spear can be used for paralysis to avoid said attack.
- The attack will execute after the grey smoke disappears.
- Dodge the spears by dodging the center indicator then staying in the center to avoid getting hit by the 2 other spears.
- Kill the large bugs (1 in NM 2 in HM)
- After the gray smoke appears (17 seconds after spears spawn) immediately get in the spear to get paralysed, you can use space.
x50 Spin Attack Stagger
The boss jumps and lands in the center, creating an acid ring around the outer area.
It will start spinning with a stagger check, getting hit by attacks will knock you back.
There is a hidden Inanna timing that causes a special interaction, free dps time and buffs, check out ATK's video above to check it out.
If the Inanna timing isn't correct, the boss' attack will follow an attack pattern.
After staggering, there will be a counter.
Stagger and avoid the attacks, counter after staggering.
Avoid the attack pattern:
- Horizontal
- Vertical
- Diagonal, 5-11
- 7 o'clock safe position for next 3 attacks
x21 Egg Form
- The boss jumps to the center and transforms into an egg.
- It will shield itself a total of 4 times, which will make the boss stronger for every shield not broken.
- Small bugs and exploding pools will also appear.
- In Hard Mode, additional large fish pools spawn under everyone's feet a little over every second, dealing significant percentage damage.
- Killing 3 bugs grants bonus damage to shields.
- Getting hit by 5 bugs paralyses you.
- The green area below the boss will grant plague stacks, getting 10 will now cause an uncleanable damage over time effect.
- Quickly kill the bugs, can be used to clear them efficiently.
- Damage the boss till around x6 or x7 plague stacks.
- Step out and cleanse the plague stacks.
- Repeat the process.
Phase 3
Counter + Root
Phase 3 begins after the cutscene.
2 additional patterns randomly occur every 30 seconds:
The boss will charge and root players around him, followed by stabbing a random player.
The stab attack is a guaranteed death.
Use to free players quickly.
It will jump away, creating many pools under your feet around the map, he will then land at a random spot for counter check.
If the counter is failed, it will throw a spear causing a mapwide explosion.
Use the minimap to check his position for the counter.
Notable Mechanics
Yellow Ring Grab
The boss will crouch and smash the ground with tentacles.
Avoid getting hit by the yellow indicator, as it will result in being grabbed and disabled for an extended period.
When the boss is staggered from the internal meter, he will always perform this pattern.
Don’t Touch the Grass
The boss will crouch and smash the ground with tentacles.
If a player touches grass, it will trigger a follow up attack.
The follow up attack is a large explosion that can knock people out of the stage.
Never touch grass
Counterable Mechanics
Standing Counter Variations
The boss will repeatedly smash the ground, and after finishing, he will always counter.
If you get hit by the last 3 attacks, he will change his pattern to outside-inside safe ground smash.
Generally, when you see the boss smashing the ground, it's best to position yourself at his back to prepare for the counter attack.
In the 2nd variation, the boss performs slower smashes and crosses his spears to execute a counterable 270 slash attack.
If you get hit by his 2nd and 3rd hits, he will proceed to do the 270 slash.
Hopping to Counter
The boss will hop around the map, and upon landing, he will perform a counterable attack.
This attack can be canceled entirely by taunting, but use your taunt when he's on the ground.
Normal Attacks
Jump Attack
The boss will leap high and slam the ground, followed by a long stab attack that inflicts significant damage and creates numerous pools.
The second stab attack can be cancelled by taunting the boss.
Triple Stab Grab
The boss charges up his spear and starts stabbing, showing long yellow indicators on an aggroed player.
This sequence happens three times unless the player gets grabbed.
It's essential for the aggroed player to manage the attacks to avoid rotating the boss's head too much.
Single Stab to Backslash
If the boss stabs only once, he will follow up with a backslash to hit players attacking from the back.
Stomp Grab
The boss will stomp the ground and stab with his spear.
If you get grabbed, the boss will vomit on you, knocking you away.
If no one is grabbed, he will stab backward to hit players attacking from behind.
Ground Slash to Tentacles
The boss will slash the ground.
If no one is hit, he will follow up with a smash attack.
If someone is hit by the initial red indicator, he will lift them up and unleash a quick brandish of tentacles, juggling players in the air.
You can get hit by this on purpose to extend the animation, using super armour to not get juggled.
Borpa Spin
The boss will slam his spears sideways and spin around inside safe.
He will slowly move and change direction once.
If you get knocked out, use your spacebar to get back in quickly.
Slow Charge
The boss will run with his spears in front, he will move very slowly, but anyone caught by this will be grabbed.
When he finishes running he will pin everyone who is grabbed on the ground and use his tentacles to attack them.
Some people get grabbed on purpose to extend the animation.