Normal mode:
1600 gear score
Hard mode:
1620 gear score
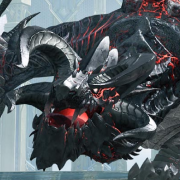
Voldis Gate 2 Boss Guide
Overview
Introduction
Welcome to the Voldis Gate 2 guide. Both Normal Mode and Hard Mode feature the same mechanics.
Thank you to ATK for providing the video footage, make sure to check out his video guide below!
Full Video Guide


Universal Mechanics
Gaze
The closest player to the boss will get marked with gaze.
The boss will focus their attacks towards the player with gaze.
Blood Orbs
4 blood orbs will spawn based on the damage dealt to the boss. These orbs must be picked up, any orb that hits the boss will heal the boss.
Upon taking an orb, you gain the following buffs:
- Cooldowns are massively reduced, this also applied to your awakening.
- Resource generation is massively increased.
However, if you get hit by an attack whilst the orb buff is active:
- You will rapidly decrease to 10% HP.
- Using a HP potion will not stop you from getting to 10%.
- Shielding is recommended, especially from a support awakening.
- Your missing HP gets turned into life orbs, which you can pick up to regain your HP.
Exodia
Pieces of Exodia
Below the boss' HP bar, icons representing different body pieces will appear, this works much like Exodia from Yu-Gi-Oh:
- 5 pieces will wipe the raid.
- 3 pieces will enhance the mechanics.
Guardian Restraining Orb
All players should pick up before this gate starts from the cubes behind the battle item preparation zone. When a boss is restrained the safe spot for most patterns is the side that the boss got restrained.
To use :
- Throw the at the boss' head to ensure it lands if the boss moves forward for a normal attack.
- It will explode after 5 seconds, indicated by the progression of the pattern around the orb.
- When detonated, the orb flies in the air and attaches to one of the boss' arms.
- The boss stomps, creating a red telegraph attack in a star shape.
- The first stagger phase commences.
Stagger Phases
There are a total of 3 stagger phases:
- Only the first 2 are possible under normal conditions.
- There are ~3 patterns before each stagger phase. Successfully using and completing the stagger phases will remove 1 body part.
Destruction Phase
Successfully completing the destruction phase will remove its Pieces of Exodia. After this phase the boss will get a 45 second cooldown period before you can use your next .
To trigger the destruction phase, a must be used when the boss is bound.
There are 2 strategies used:
Low DPS
- Stagger 1st
- Stagger 2st
- Fail Stagger 3rd
- Counter
- Stagger
- Stagger 1st
- Stagger 2st
- Destruction
Normal DPS
- Stagger 1st
- Stagger 2st
- Fail Stagger 3rd
- Counter
- Stagger
- x2
- Destruction
Major Mechanics
x95 Clones
- Boss jumps to the center.
- Boss performs gaze mechanic.
- 3 clones are spawned.
- Boss starts performing directed cone attack to the gazed player.
- 2 of the clones must be countered to avoid a wipe.
- Remaining clone performs gaze mechanic (one eye instead of two)
- Remaining clone will constantly rotate to find the gazed player, if he's found it's a wipe.
- Remaining clone must be killed.
Main Boss Player
- Go to the center to receive the gaze.
- Constantly dodge the boss' attacks, don't aim them at teammates.
Clone Players
- Move to your assigned clone.
- Counter if needed.
- If you get the gaze mechanic, continuously dodge the clone's cone attack, if you get spotted in this attack it will cause a wipe. Ping your location for your teammates to kill the clone, don't DPS.
- If you countered, kill the remaining clone.
x30 Tower
- The boss climbs the tower.
- A center safe AoE is cast.
- An edge safe AoE is cast.
- Projectiles will spawn, moving forward. Getting hit by an orb will CC you and likely get you killed.
- The boss performs a stagger check.
- Boss performs an outside safe AoE.
- Flames surround the battlefield and the boss charges forward.
- The boss will continue charging around the battlefield until bound and destroyed.
- Go to the center.
- Use if you have it.
- Move to the opposite end of the boss to the safe spot.
- Dodge the projectiles and reach the boss.
- Stagger the boss.
- Move away from the boss to dodge the AoE attack.
- Instantly throw your to the center of the battlefield.
- If:
- 2 Orbs Hit then use destruction.
- 1 Orb Hit then stagger and use the orb afterwards.
- 0 Orbs Hit then after the boss does the breath attack, throw your orb to the gazed player to bind the boss when it jumps. The gazed player should go to the middle for an easier time.
Counterable Mechanics
Frequency of Counters
There will be a counterable attack followed by a stagger check every 1:30 minutes, it is also signalled by a unique roar sound.
Assuming you successfully performed the destruction phase with using one of the 2 mentioned strategies, the timings should be 8:30, 7:00 and 5:30.
Dashes
The boss steps back, then will dash forward. If you miss the first counter, he will dash again.
Tail
The boss lowers his head, then will initiate a counter.
You can thrown an orb right after staggering the boss.
Normal Patterns
Roar
Every time the boss roars they will gain pieces of Exodia.
An orb can be used immediately after the roar.
Kick & Tail Smash
The boss will briefly look back before kicking the players behind it, then smashing its tail.
Tail Swipe
The boss will rotate sideways, then swing its tail the opposite way.
Grab
The boss flashes its eyes and bites a player in front of it.
Fire Breath Explosions
The boss breathes fire onto the ground, creating donut shaped explosions on the battlefield, as well as player-targeted explosions.
Targeted Explosions
The boss jumps, then runs backward. When it breathes out fire it will cause targeted explosions to appear on the players.
Cross Slam
The boss slams the ground twice, then 2 cross shaped attacks appear.
Flamethrower
The boss moves its head to the side and prepares flames in his mouth, then releasing the flames in the opposite direction.
Freedom Patterns
Center Inside Safe
The boss jumps to the center and creates ring explosions moving outwards, make sure to dash inside.
Red Orbs
The boss will roar and spawn red orbs around the battlefield with a laser pointer.
You need to step on these orbs to get rid of them, be careful of the explosion coming afterwards.
If an orb is not popped the laser will fire.
Throwing an orb at the very start of this mechanic can cancel it early.