Normal mode:
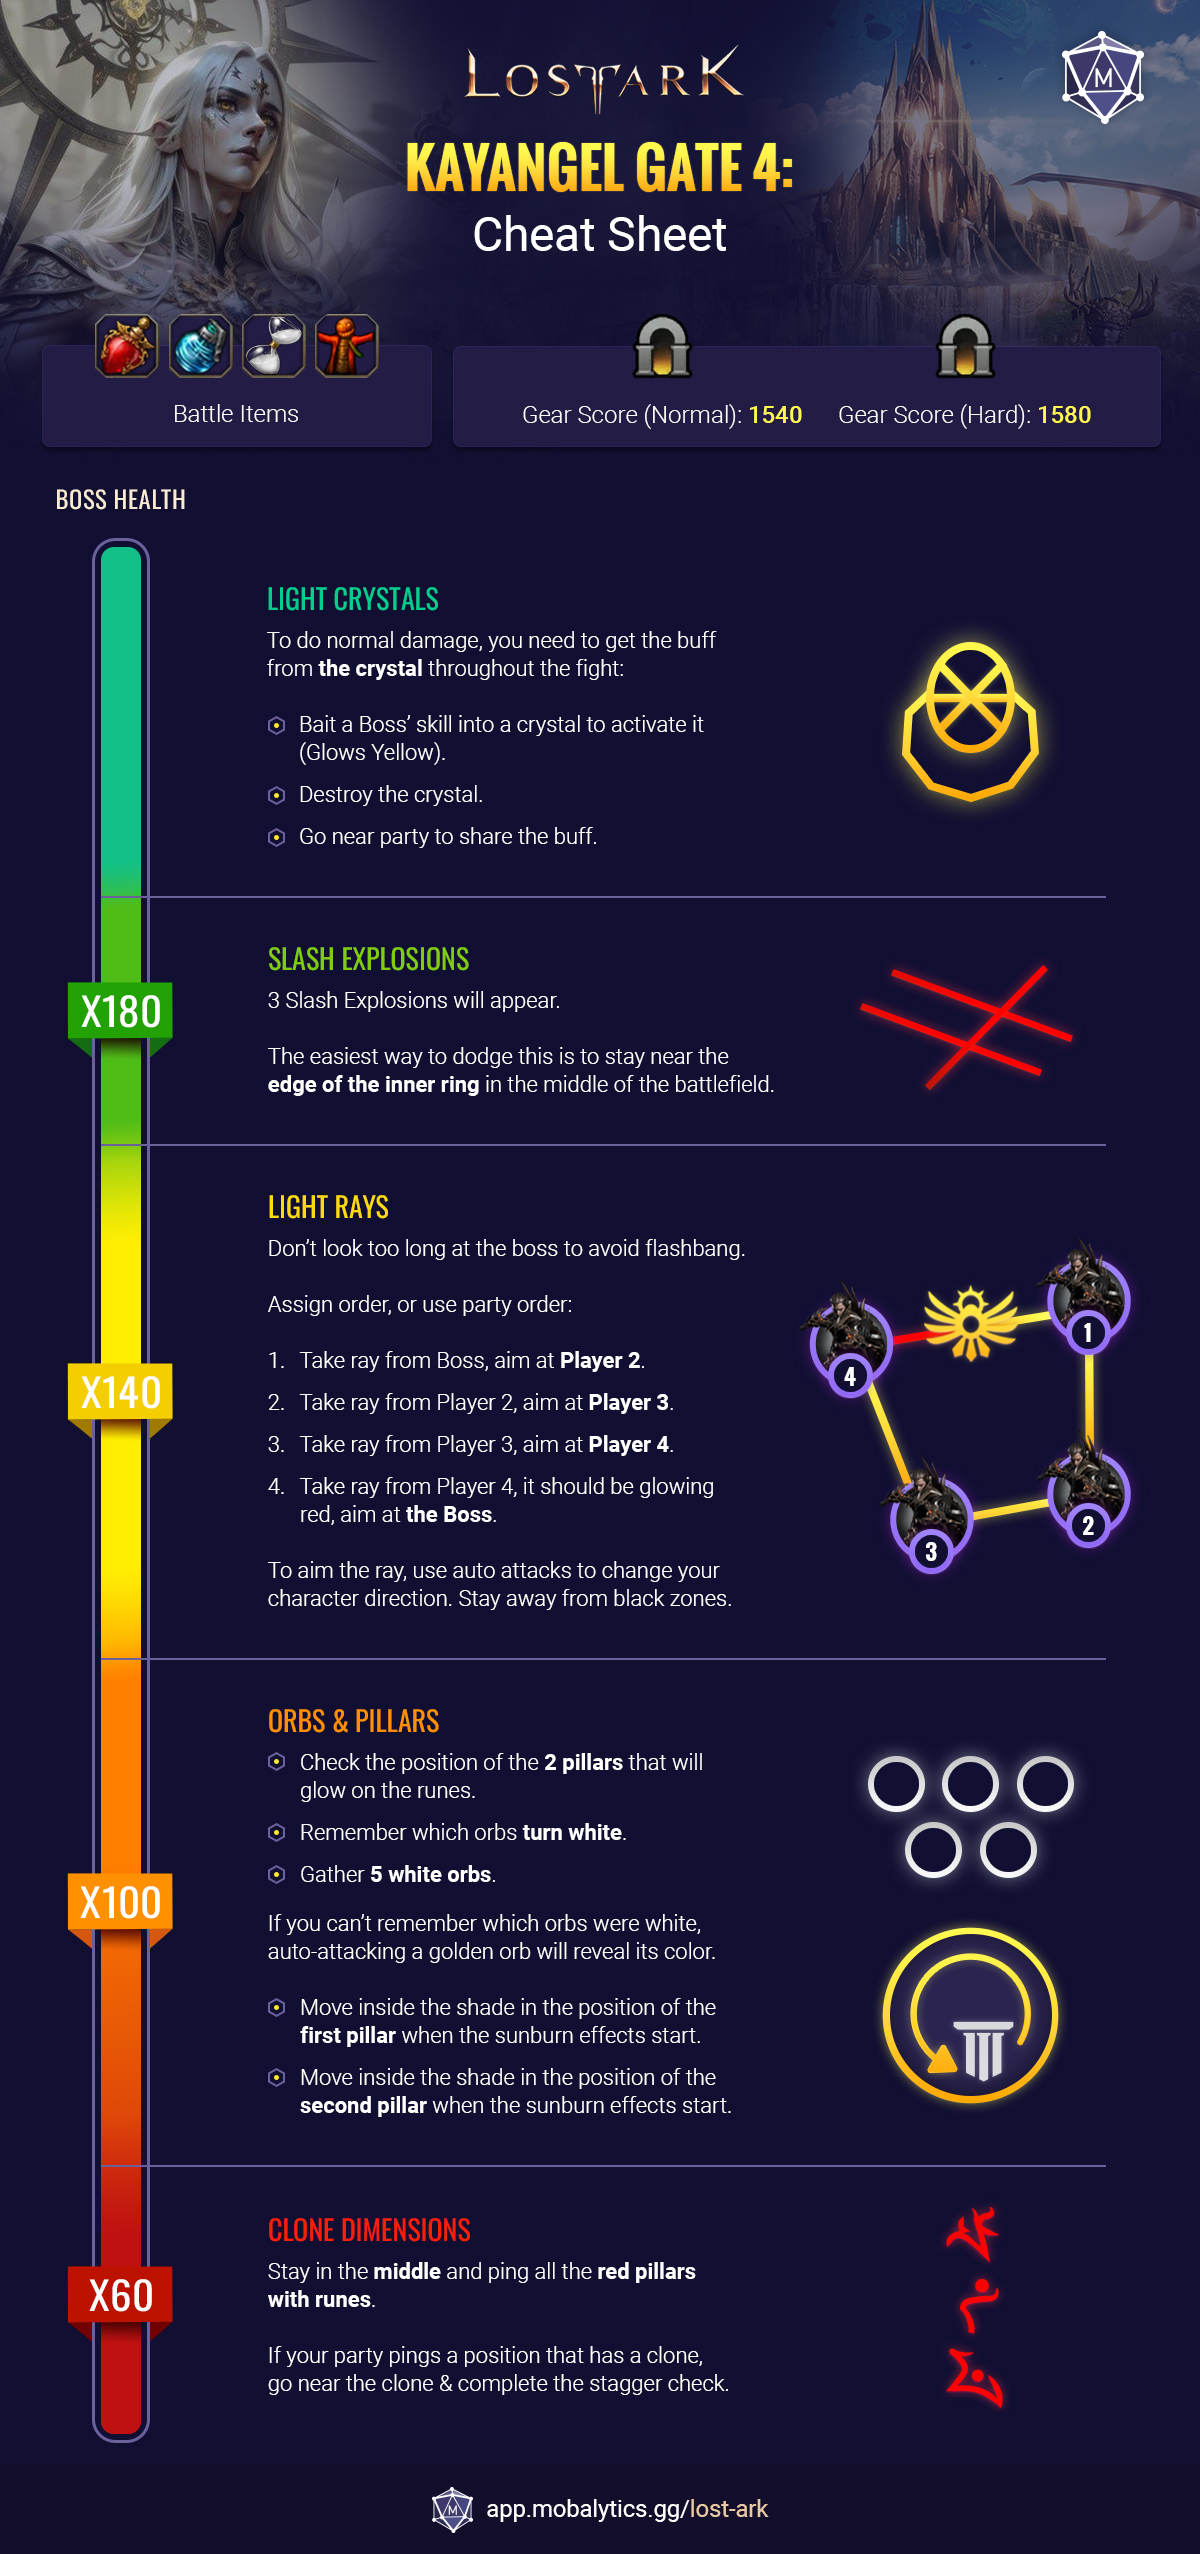
1540 gear score
Hard mode:
1580 gear score
Kayangel Gate 3 Boss Guide
Overview
Introduction
Kayangel doesn't have as many mechanics as Legion Raids, though from this point onwards it will demand higher DPS uptime, better ability to dodge normal patterns and aggro control.
This raid provides the materials needed to level up your gear set bonus to 3, and upgrade to an ancient level ability stone - which provides great HP gain.
Watch ATK’s video guide below for a video breakdown of the fight with some extra tips and tricks at the end.
Full Video Guide


Cheat Sheet

Universal Mechanics
Light Crystals
- Lauriel takes 99% reduced damage.
- Crystals spawn around the battlefield.
- If Lauriel's skill hits a crystal, it will activate and turn yellow.
- If a player destroys an activated crystal it will grant an attack buff that can be shared and lasts for 2 minutes.
- If the crystal is not destroyed, it will shoot a light beam to a targeted player.
- Crystals respawn after 2 minutes.
When the crystals appear, Lauriel will always cast an Enhanced Mirror Pattern.
- Bait one of Lauriel's abilities to a crystal.
- When the crystal is yellow/activated, destroy it to receive the buff.
- Move near your team to give your team the buff.
- Maintain this buff throughout the fight.
If a crystal gets activated, destroy it even if you already have the buff to avoid the light beam attack.
Usually supports can go around breaking crystals and getting the buff to their party, though if there is a crystal nearby you should always destroy it.
Enhanced Mirror Pattern
Lauriel looks at the target player, dashes away and disappears. He will then appear behind the aggro'd player with a mirror in front of him. He will the break the glass with a distinct sound and shoot a laser.
Getting hit by the mirror will change your HP to 1, and knock you very far.
After x180, he will also vacuum to pull you into the mirror.
Aggro'd players shouldn't move so he doesn't rotate the mirror, then dodge the laser after hearing the sound or seeing the mirror break.
Scarecrows can make Lauriel target it so all players can DPS behind him.
After x60
You will start getting non cleansable stacks of a debuff that increases damage taken.
The shadow mechanic will periodically happen:
- A light pillar will appear.
- A shadow will appear in the side of the map that the pillar appeared.
- An aggro'd player will be targeted with a vacuum attack that will try to pull players away.
- Players must stand in the shadow to not die.
You can the shadow mechanic.
Major Mechanics
x180 3 Slash Explosions
3 explosions will appear.
A line explosion, a gear explosion and a line explosion.
The easiest way to dodge this is to stay near the edge of the inner ring in the middle of the battlefield.
When the crystals appear, Lauriel will always cast an Enhanced Mirror Pattern.
You can force the aggro on you by standing in the middle of the battlefield while the rest of your teammates stay away.
Then you can start moving towards near a crystal so after Lauriel disappears and teleports, he casts this pattern near a mirror.
After Lauriel teleports, you can make his mirror hit the crystal by moving to the direction of the crystal to rotate Lauriel, causing the crystal to get hit and activated.
x140 Light Rays
- Lauriel will dash away and appear in the middle of the battlefield.
- He will cast 3 light rays.
- Standing in the light rays for too long will freeze you, indicated by a bar beneath your character.
- Getting frozen by the light ray will cause you to shoot a light ray to the direction your character was facing.
- Black zones with golden crystals will spawn that petrifies players inside it.
- Looking at the boss will cause you to eventually get flash banged.
- Light rays should eventually go through all players, where the last player points the ray at Lauriel.
The order of taking the light rays should be fixed, assign these before-hand, or use party order.
To create a light ray, stand in a light ray (created by boss or party member), use your auto attacks to change where your character if facing to direct the laser.
Depending on your order, you need to:
- Get a light ray from the boss, be careful to aim it somewhere where there are no black zones. Make sure only 1 person in your party takes a light ray from the boss.
- Get the light ray from the 1st player, again, aim this ray at somewhere where there are no light zones.
- Get the light ray from the 2nd player, again, aim this ray at somewhere where there are no light zones.
- Get the light ray from the 3rd player, the last laser will glow red, aim this ray at Lauriel.
x100 Orbs & Pillars
This mechanic has two patterns.
Orb gathering and light pillars:
- Lauriel slowly flies to the middle, creating a small safe zone in the center of the battlefield.
- Golden orbs will spawn all around the battlefield.
- A light pillar will appear from a rune symbol on the floor, this indicates clock position for the first shadow mechanic, then a second one appears.
- The orbs will turn into black or white orbs, then back into golden orbs.
- Gathering 5 orbs that were white will give you a shield to survive.
- Attacking the golden orbs using auto attacks will briefly show you their colour - white or black.
- Taking black orbs will stun you and remove a stack.
- Ring explosions appear, two ring explosions after the orbs disappear indicate the start of the shadow mechanic.
Shadow mechanic:
- Light from above and patterns on the floor will appear on the screen.
- A sunburn attack will start, with a safe position previously indicated by the rune/position on the first light pillar. It will be in the shade.
- 2 ring explosions appear again, and the same mechanic occurs, but the safe spot is the rune/position on the second light pillar. It will be in the shade.
These attacks will activate crystals, if you are done collecting orbs, destroy some crystals if necessary to ensure they respawn in time.
Use x3+1 positions for where players should gather orbs.
- Stay in the middle to not get hit by the first attack, pay attention to the white orbs and the light pillars.
- Gather 5 white orbs in your position, if you don't remember where the white orbs are, hitting an orb will reveal its colour.
- If you have full crystals, destroy some of them to trigger their respawn timer.
- Dodge the 2 ring explosions.
- Go to the position where the first light pillar was to dodge the attack.
- Dodge the 2 ring explosions.
- Go to the position where the second light pillar was to dodge the attack.
x60 Clone Dimensions
- Lauriel teleports to the middle and sends all players to separate dimensions.
- There will be Lauriel clones, red pillars and red pillars with runes.
- The correct clone has to be staggered.
- The correct clone is the clone where your teammates have red pillars with rune symbols.
- Stand in the middle, look around and ping all the red pillars with runes. Your party should look at different parts of the map together so each member can easily see the pings.
- Do not get close to a clone unless you're sure it's the real one.
- If there is a clone where your teammates ping, go near the clone and it will initiate a stagger check.
- Stagger the clone.
Notable Mechanics
Hammer Pull
Lauriel will fly a short distance and pick up a hammer, blue indicators appear.
Getting grabbed will initiate an explosion.
If no one is grabbed, the explosions will be a ring pattern.
Lauriel will then cast multiple explosions around the map in the form of rings and yellow circles.
Supports should always use their ultimate here.
Hammer Frontal Smash
One player will be marked, and Lauriel will attempt a grab shown by fast blue indicators.
Line explosions will fan out from the center.
There is usually a counter after this.
Scythe Throw
Lauriel will spin his scythe.
Scythes will move around, getting hit by these will cause you to get stunned for the rest of the pattern.
He will stay in place whilst aiming a cone which indicates the grab area.
If anyone is pulled an extra explosion will occur.
Scythe Tornado
Lauriel will spin his scythe and pull everyone in. He will also mark a player.
A storm will start around him shown by red indicators.
He will then start casting 270 degree attacks towards the marked player.
The marked player shouldn't move, and just dodge when the red indicator shows.
Bow Shot with Arrow Rain
Lauriel will bring his bow out, and shoot a series of arrows, lines with raining arrows will also appear.
Standing inside the raining arrows will give you a stacking debuff that will make you take increased damage.
Aimed Bow Shots
Lauriel will target a player and shoot a series of arrows that will boomerang back toward the players.
Getting hit by the arrow will create an explosion.
Line Up Spears to Ring Explosion
Lauriel will fly up and cast map-wide lines of spears. Getting hit by this will give you a stack of the incoming damage debuff.
After 3 map-wide lines, there will be a pizza explosion and two sets of ring explosions.
Line Explosions
Lauriel will disappear and apply large horizontal lines on each player, he will then slash to create a line explosion.
Triangle Explosions
Lauriel flies up and locks everyone up in a triangle shaped jail.
One player will be agro'd with explosions which expand.
Lightning
Lauriel will raise his hand and cast lightning bolts above your head, the third impact is a map-wide check board attack.
Normal Mechanics
Sword Slash
Lauriel will fly over and slash.
If the slash is a line, line explosions will appear, if it's a circle, circle explosions will appear.
Orbs
Three variations:
The orbs spread out linearly.
4 orbs come out in a fan shape in the front and back.
Regular orb shaped projectiles spreading out.
Wifi
Lauriel will dash backwards and get into position to slash in a map-wide wifi shape.
Getting behind him after the dash is optimal.
Ring Lock
Lauriel will stand still, then spawn a series of rings that will target then fly to nearby players.
If you get hit, you receive a stack, 3 being the maximum. This indicated how much damage you will receive.
People that got hit will then be rooted and receive the damage until freed.
You can cheese this mechanic by getting a support to shield, throwing a fire grenade below the party and continuing to DPS.